In recent years, there has been an increase in the number of locations that cannot use a tripod, and there has been an increase in the number of situations in which it is necessary to shoot with high ISO speed. We believe that in such a scene you care about is the noise. This article introduces the types, conditions, and mitigation methods of noise generated by digital cameras.

The first thing we would like to tell you is that even at low ISO speed, the digital camera data contains noise components. The reason why the noise is not noticeable is that it is made invisible by image processing such as noise reduction.
RAW Development uses its Noise reduction on a PC’s CPU, which has a higher performance than the camera’s image-processing circuitry so that more advanced noise-reduction performance can be achieved. Now let’s start by looking at the kind of noise.
Noise types, generation conditions, and correction methods
False Color
The “False color,” also known as color noise, refers to a phenomenon in which the coloring of pixels, such as red, blue, and green, that is not present in the subject, occurs randomly.
- Color noise
When the ISO speed of a digital camera is set to a high setting, pixels with colors such as red, blue, and green may be noticeable.
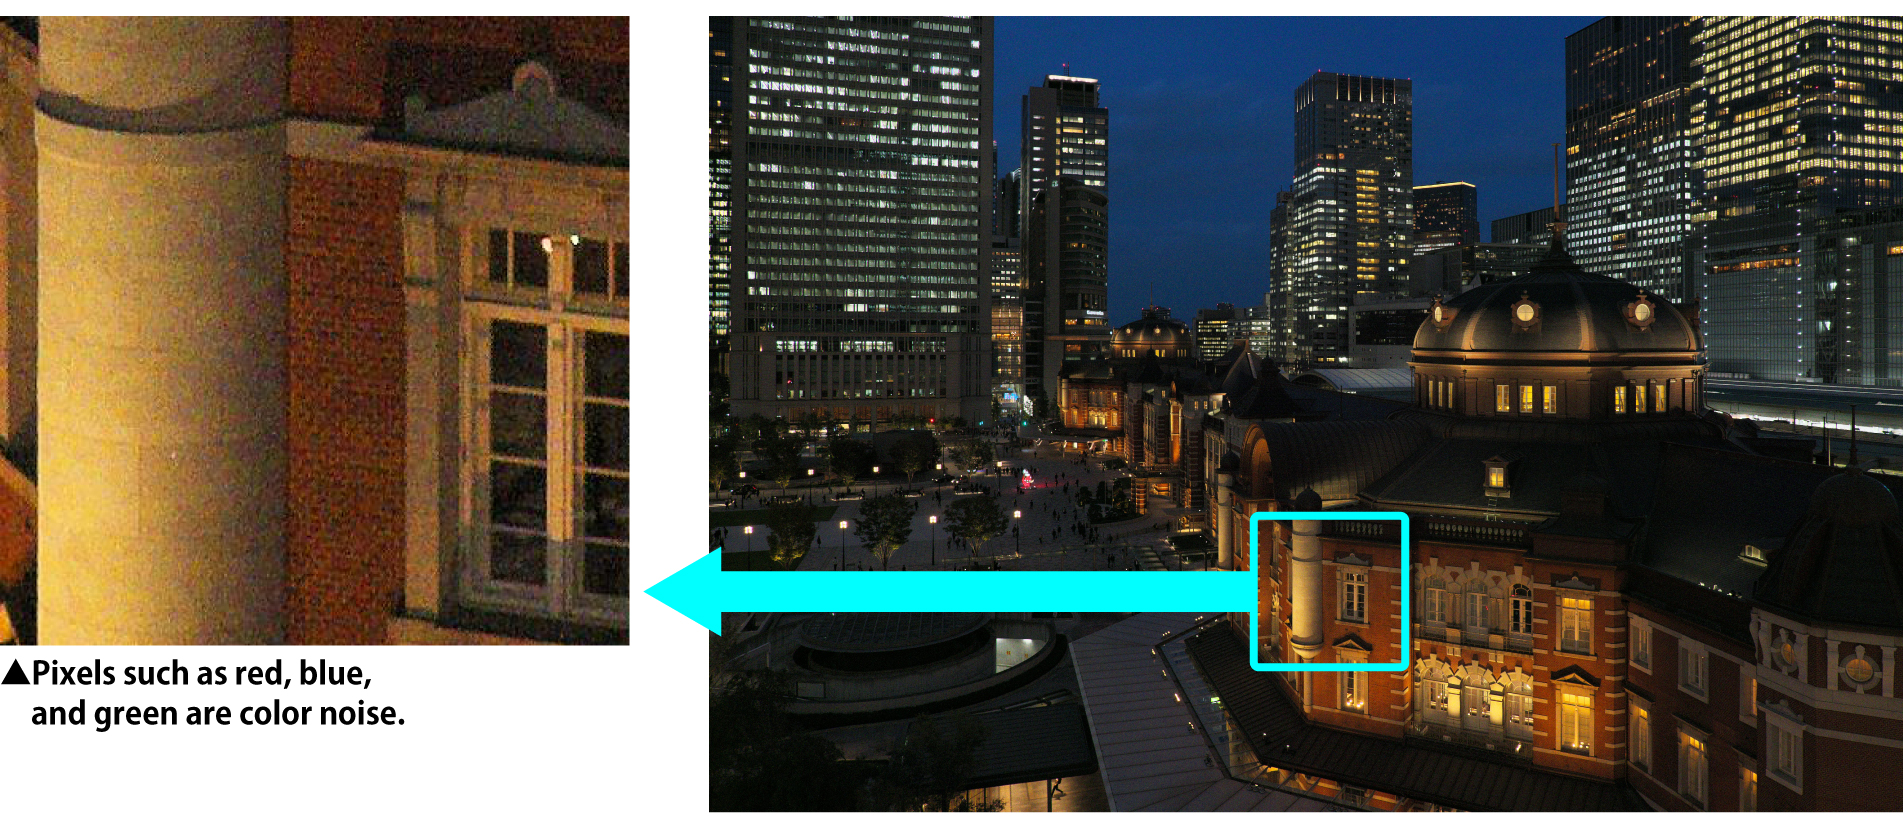
It is sometimes referred to as “Random noise” because it occurs as a random pattern when an image sensor such as a CMOS or CCD is energized (when the shutter is released). It occurs over a wide area to cover the entire screen. So, we think that many people don’t like it when making large-scale prints, etc.
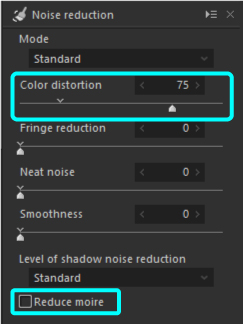
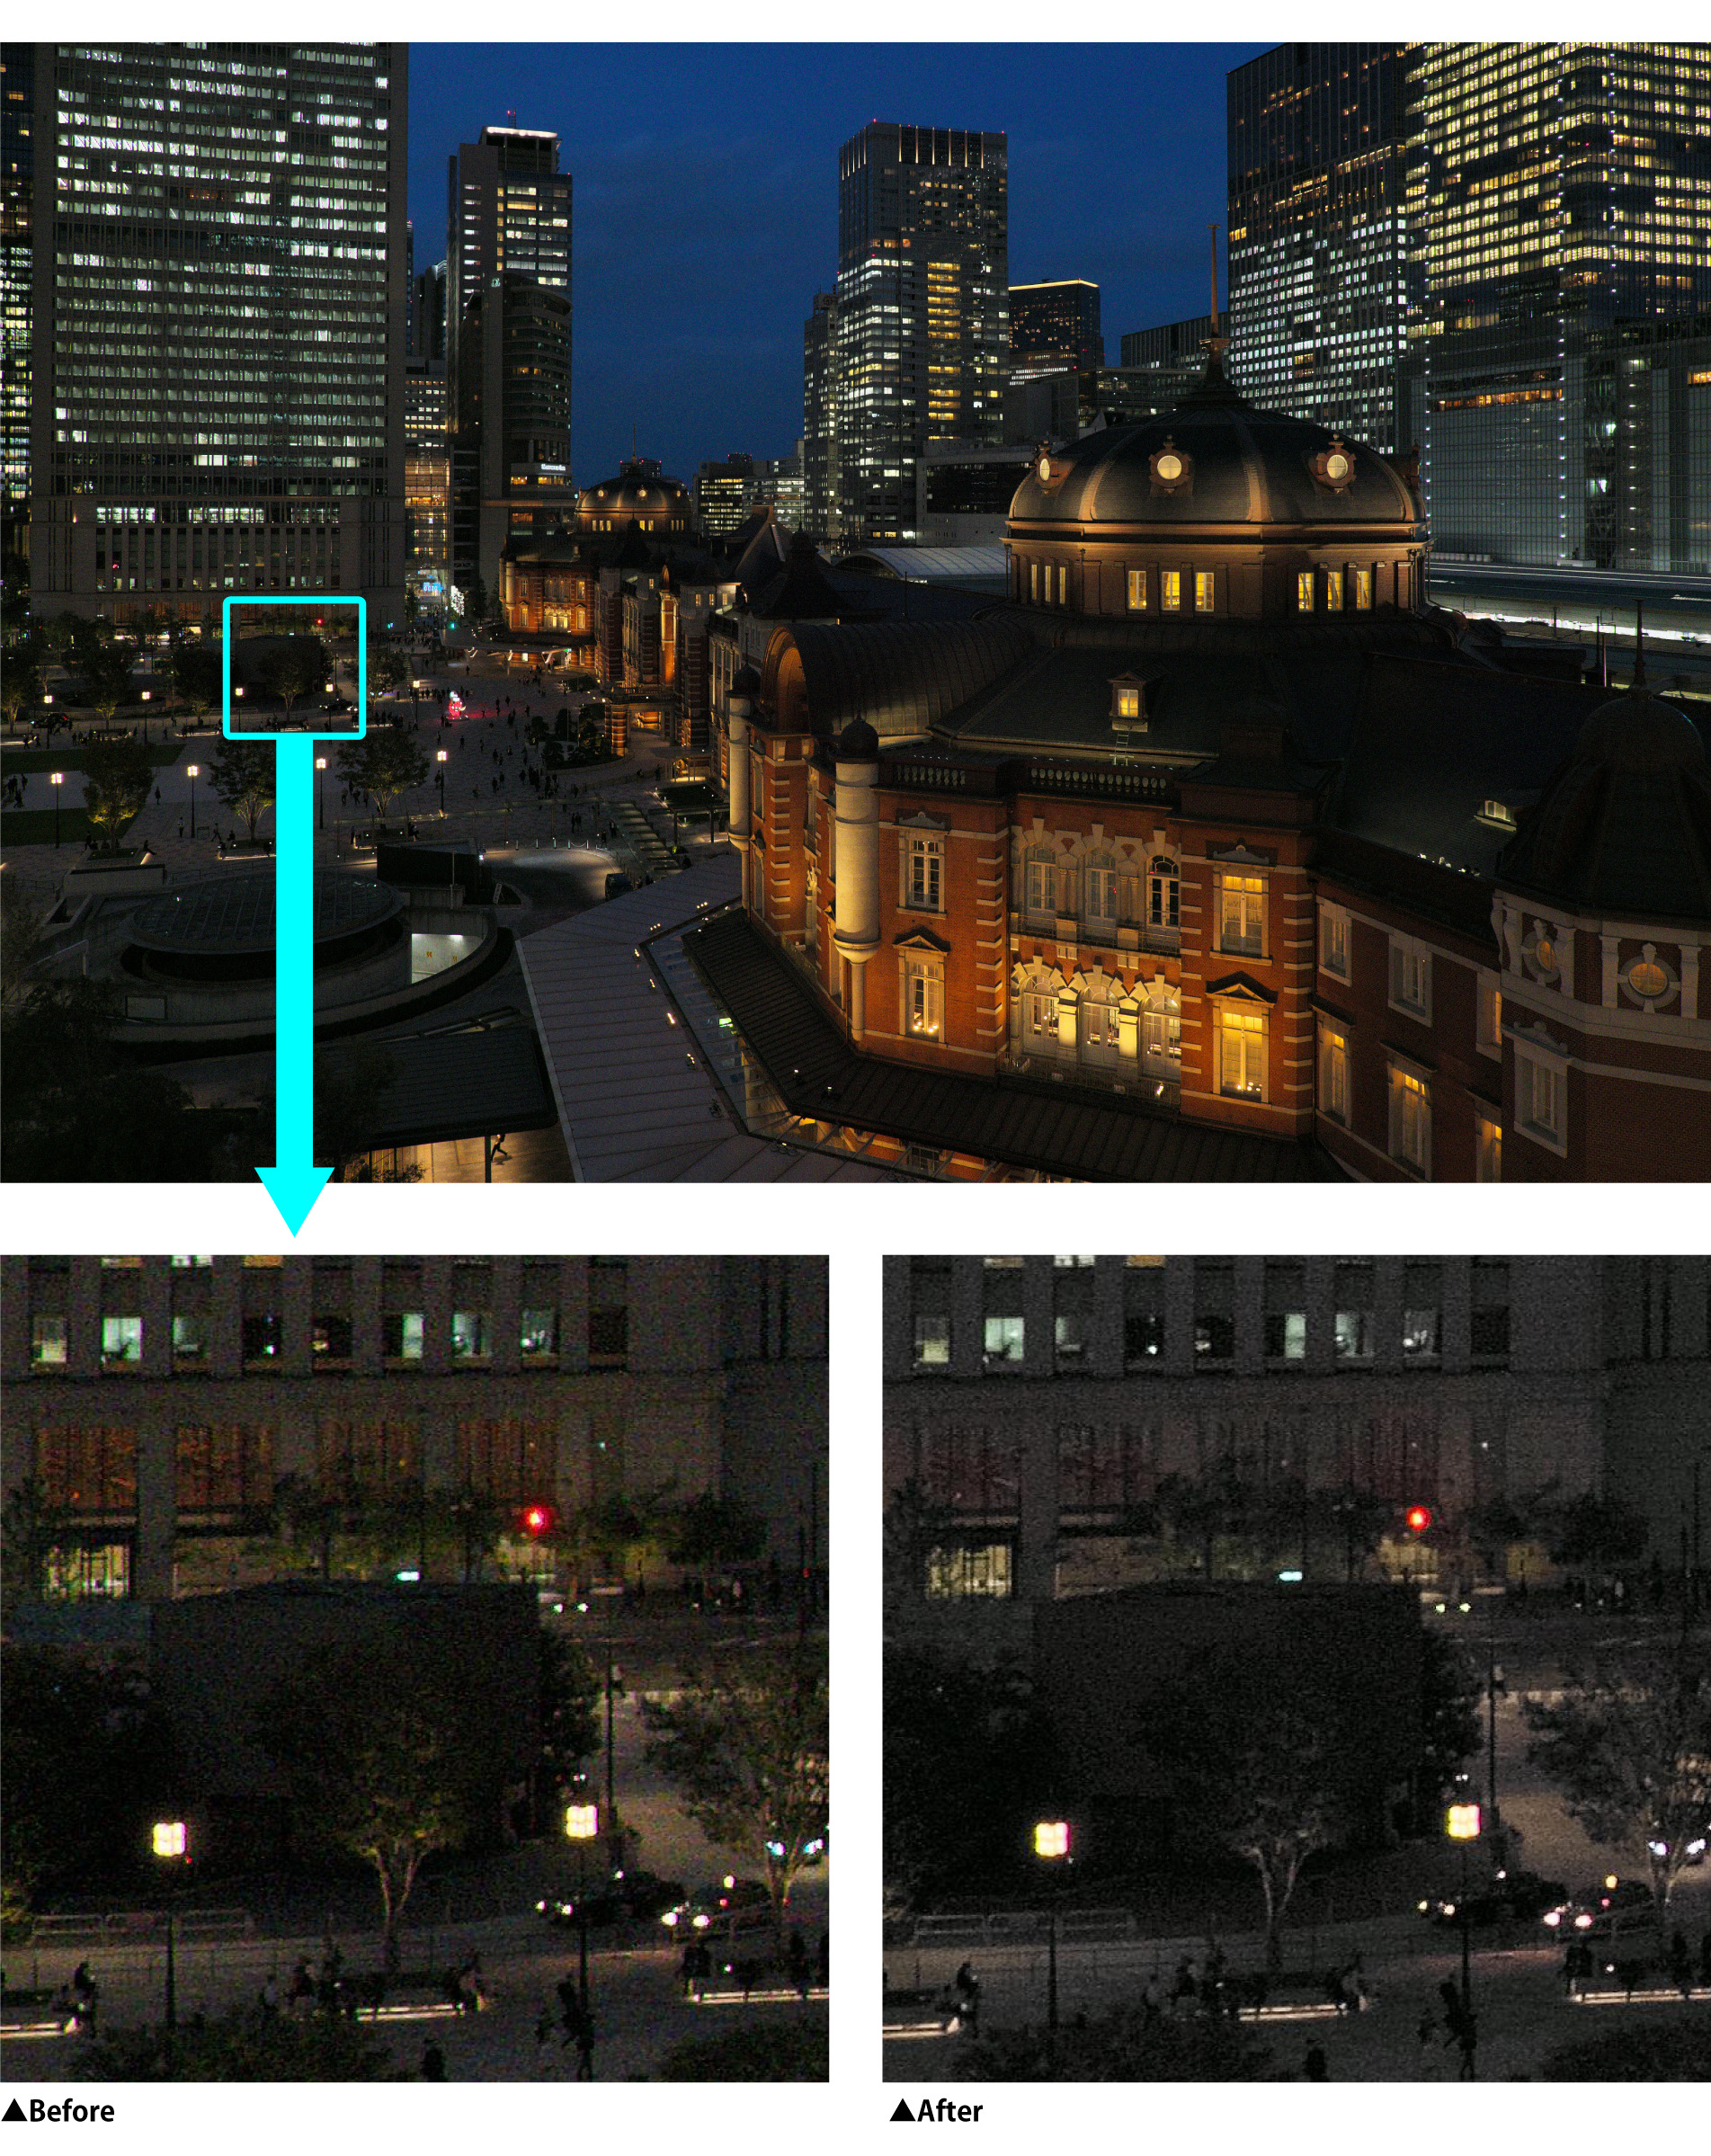
This color noise can be mitigated by setting the Color distortion in Noise reduction to a higher value when using SILKYPIX Developer Studio Series (hereinafter referred to as SILKYPI X series).
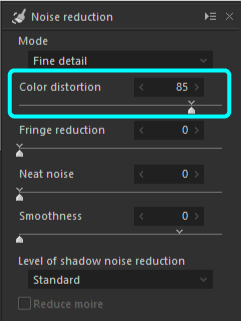
SILKYPIX series-default settings also use the “Dynamic defaults,” which vary depending on ISO speed and image sensor characteristics when shooting, so some Noise reduction effect is applied to the image when you open RAW files. However, if you use the Exposure to brighten a photograph when RAW Development, noise may be noticeable. If this happens, adjust the Noise reduction accordingly.
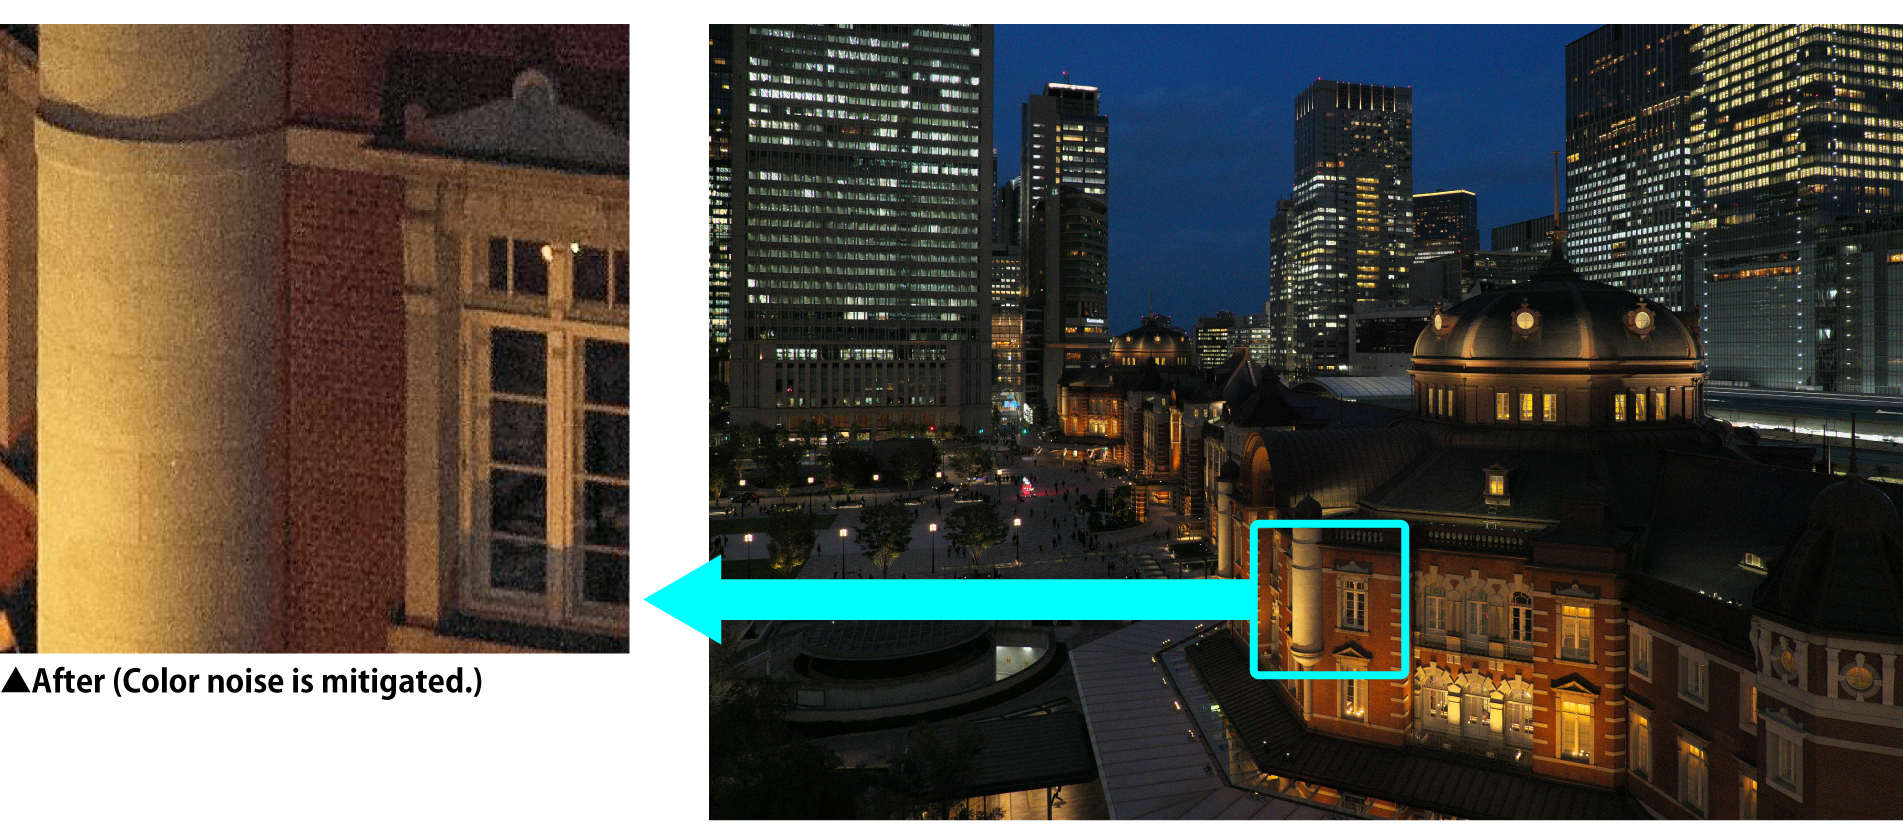
This example used Color distortion to alleviate color noise. Red, blue, and green pixels are no longer colored, but the area from which the false color is removed has an achromatic roughness. This is known as “Luminance noise,” which we will introduce in more detail later.
- Moire
Noise that causes coloring, such as red, blue, and green, to appear mainly in dense areas of the subject is called moire. Moire occurs when you shot a subject with a fine structure. It can also occur at low ISO speed.
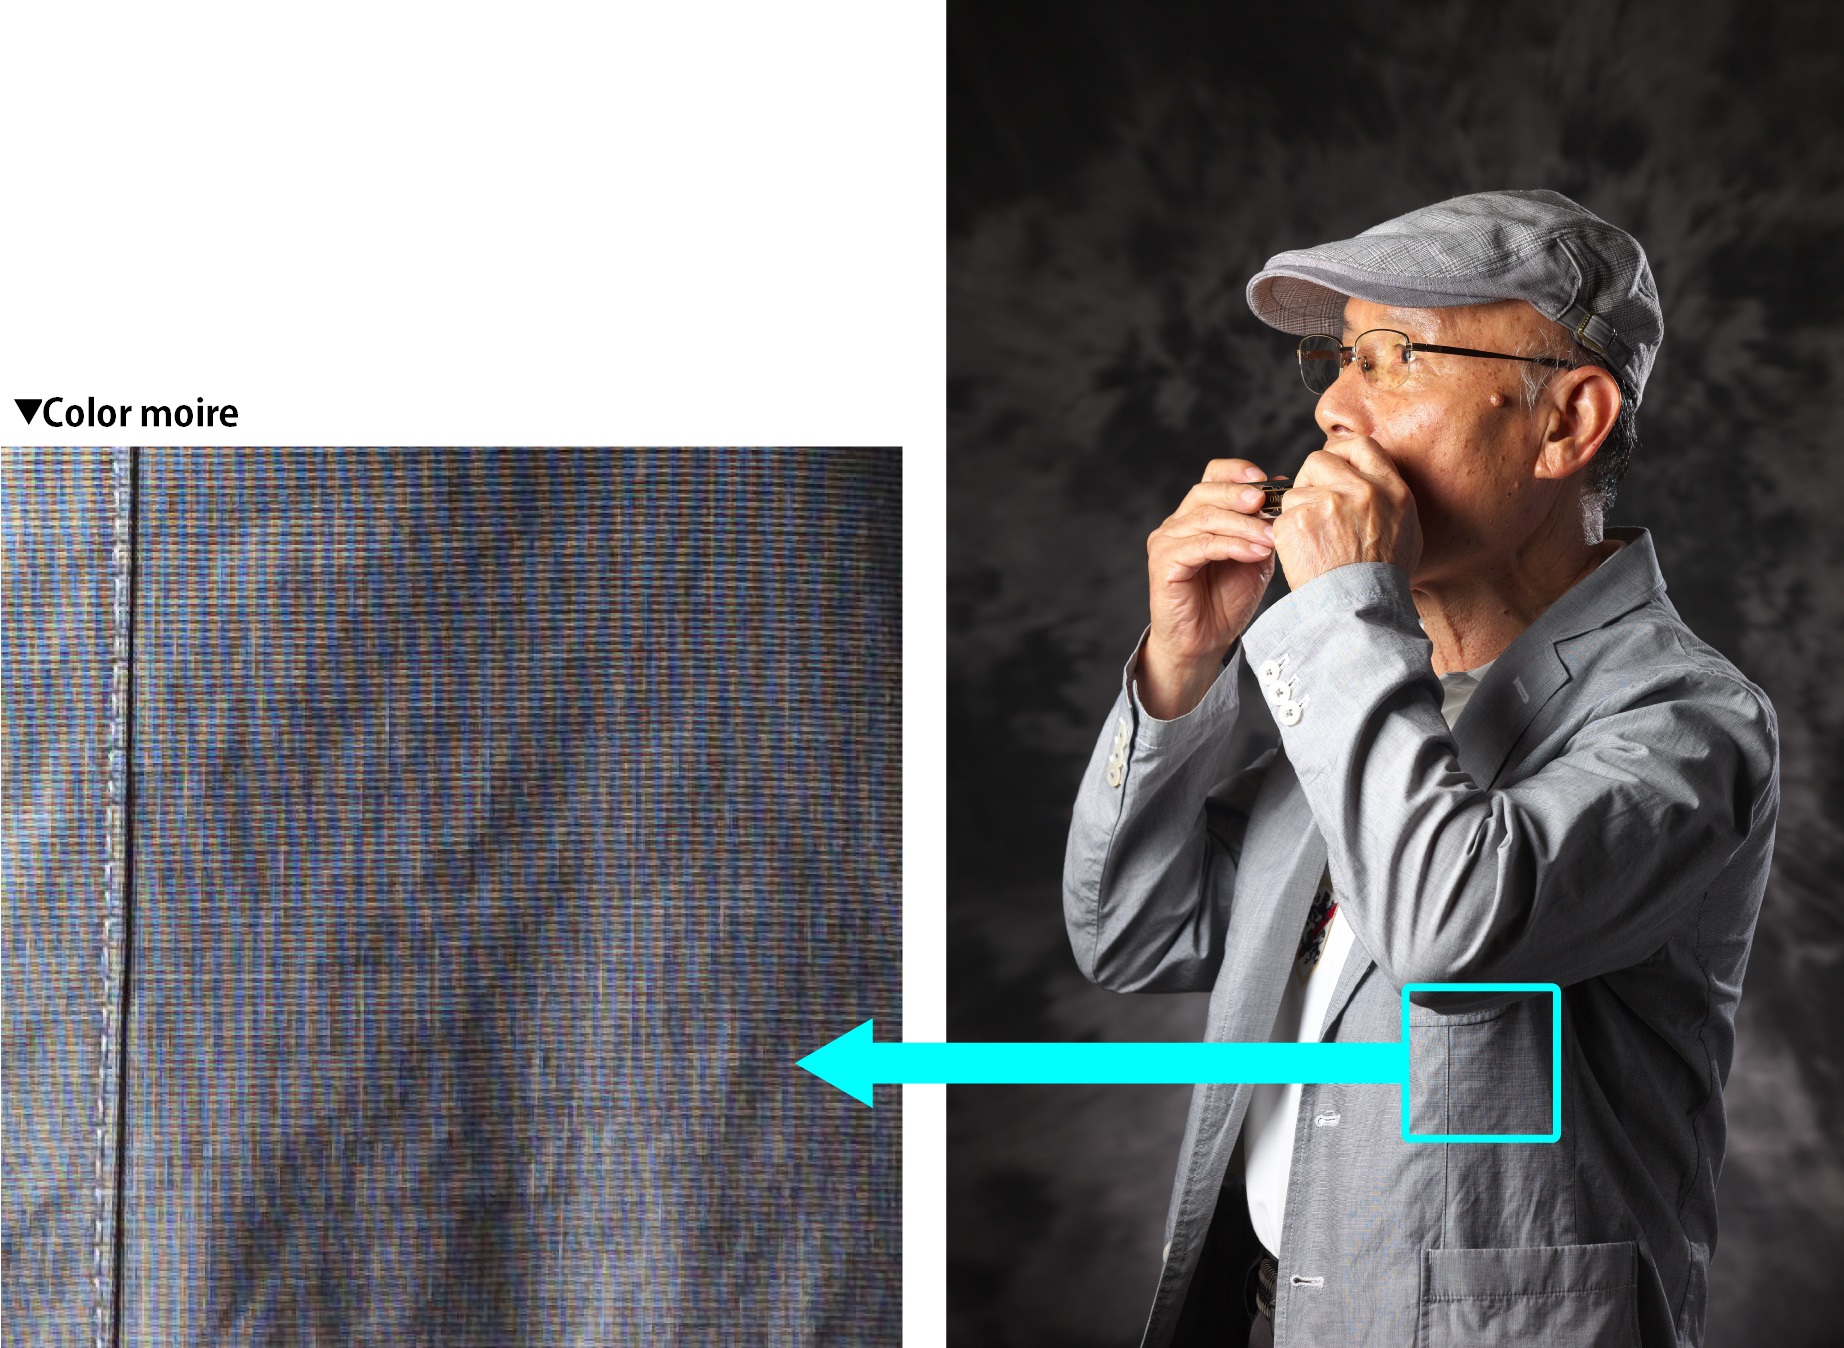
Among them, false colors that occur in stripes on the part of a subject arranged in a periodic pattern are also called “Color moire.”
In the SILKYPIX series, the color moire can be mitigated by setting the Color distortion parameter in Noise reduction to a higher value.
For color moire that cannot be removed by Color distortion, it can be relaxed by checking “Reduce Moire.”

This example used Color distortion to alleviate color moire. Not only is the noise removed, but the actual details of the subject are reproduced.
- Disadvantages of Color distortion
“Color distortion” alleviates coloring, but we recommend that you pay attention to the following side effects and use them.
Partial loss of color saturation
The saturation of colors close to the primary color, such as RGB, may decrease.
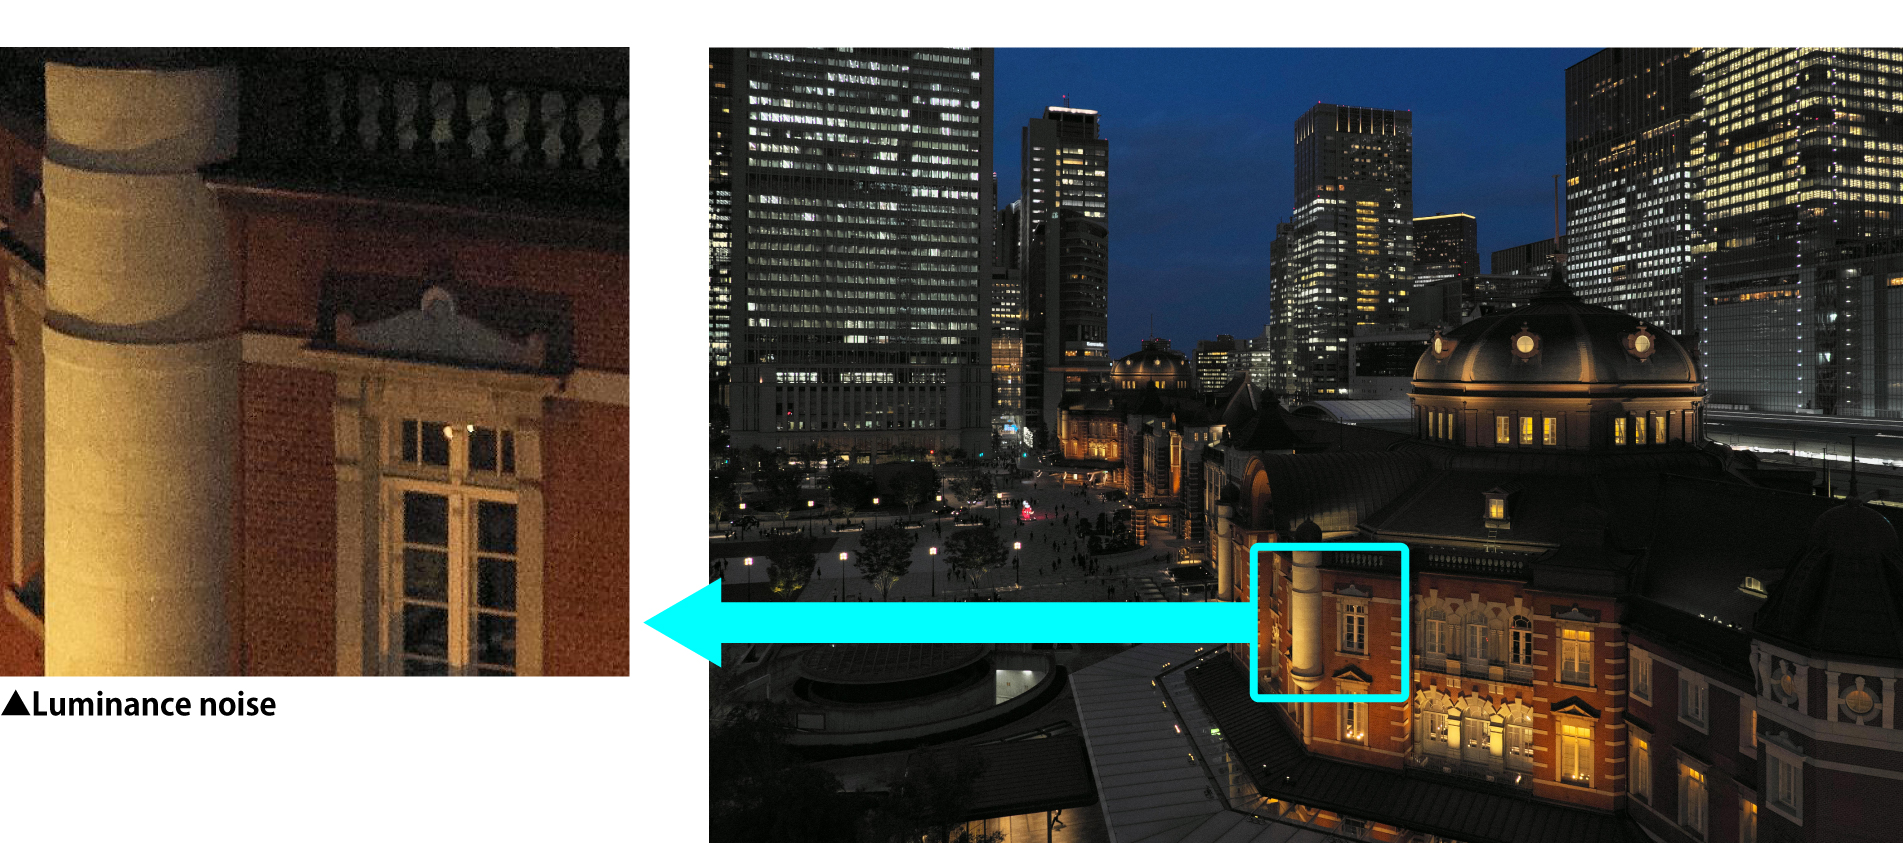
Luminance noise
The graininess of an achromatic color that remains after removing color noise with Color distortion is called “Luminance noise.”
Not all luminance noise has to be completely eliminated. There are left to create a high ISO speed shoot feel or to create a retro-wild feel. Also, when printing smaller than A4, it may not be noticeable by shrinking.
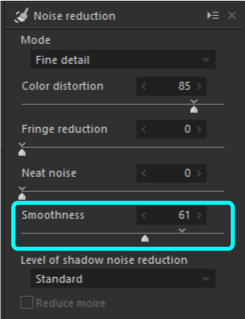
In the SILKYPIX series, the luminance noise can be mitigated by adjusting the Smoothness parameter in Noise reduction.
SILKYPIX series-default settings also use the “Dynamic defaults,” which vary depending on ISO speed and image sensor characteristics when shooting, so some Noise reduction effect is applied to the image when you open RAW files. For this reason, it is recommended that you set a value lower than the initial value when you want to retain a grainy feeling.
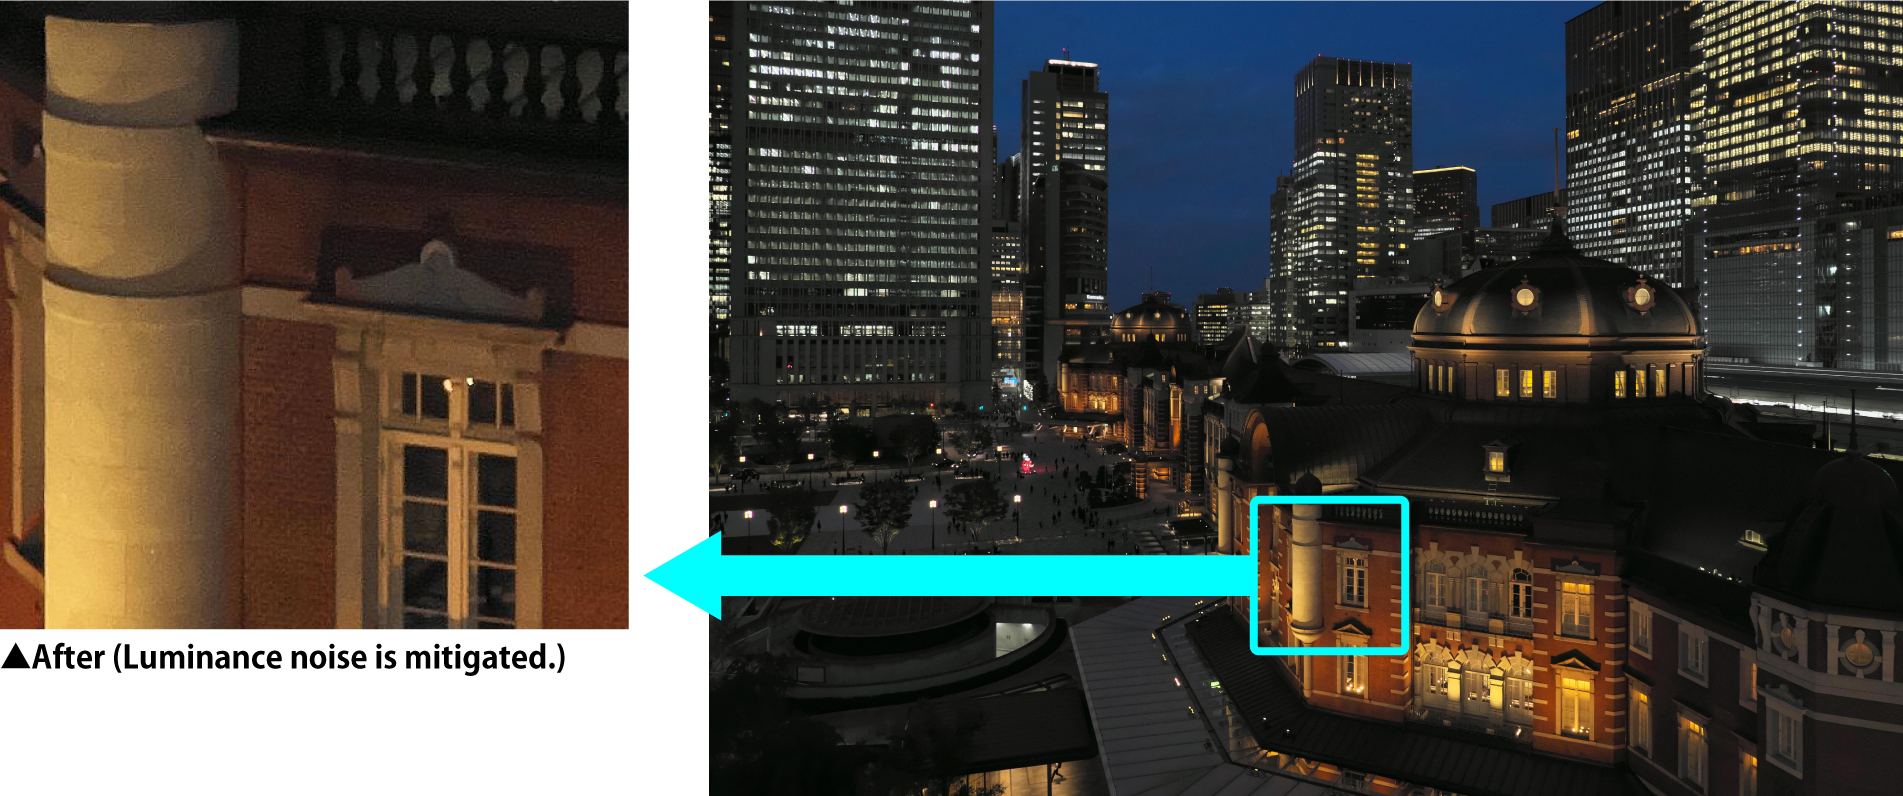
This is an example in which luminance noise was mitigated by Smoothness. If you want to alleviate the high ISO speed granularity, we recommend that you keep in mind the side effects below and apply them at a minimum.
- Disadvantages of Smoothness
Smoothness can mitigate luminance noise such as graininess and roughness, but excessive use may reduce the resolution.
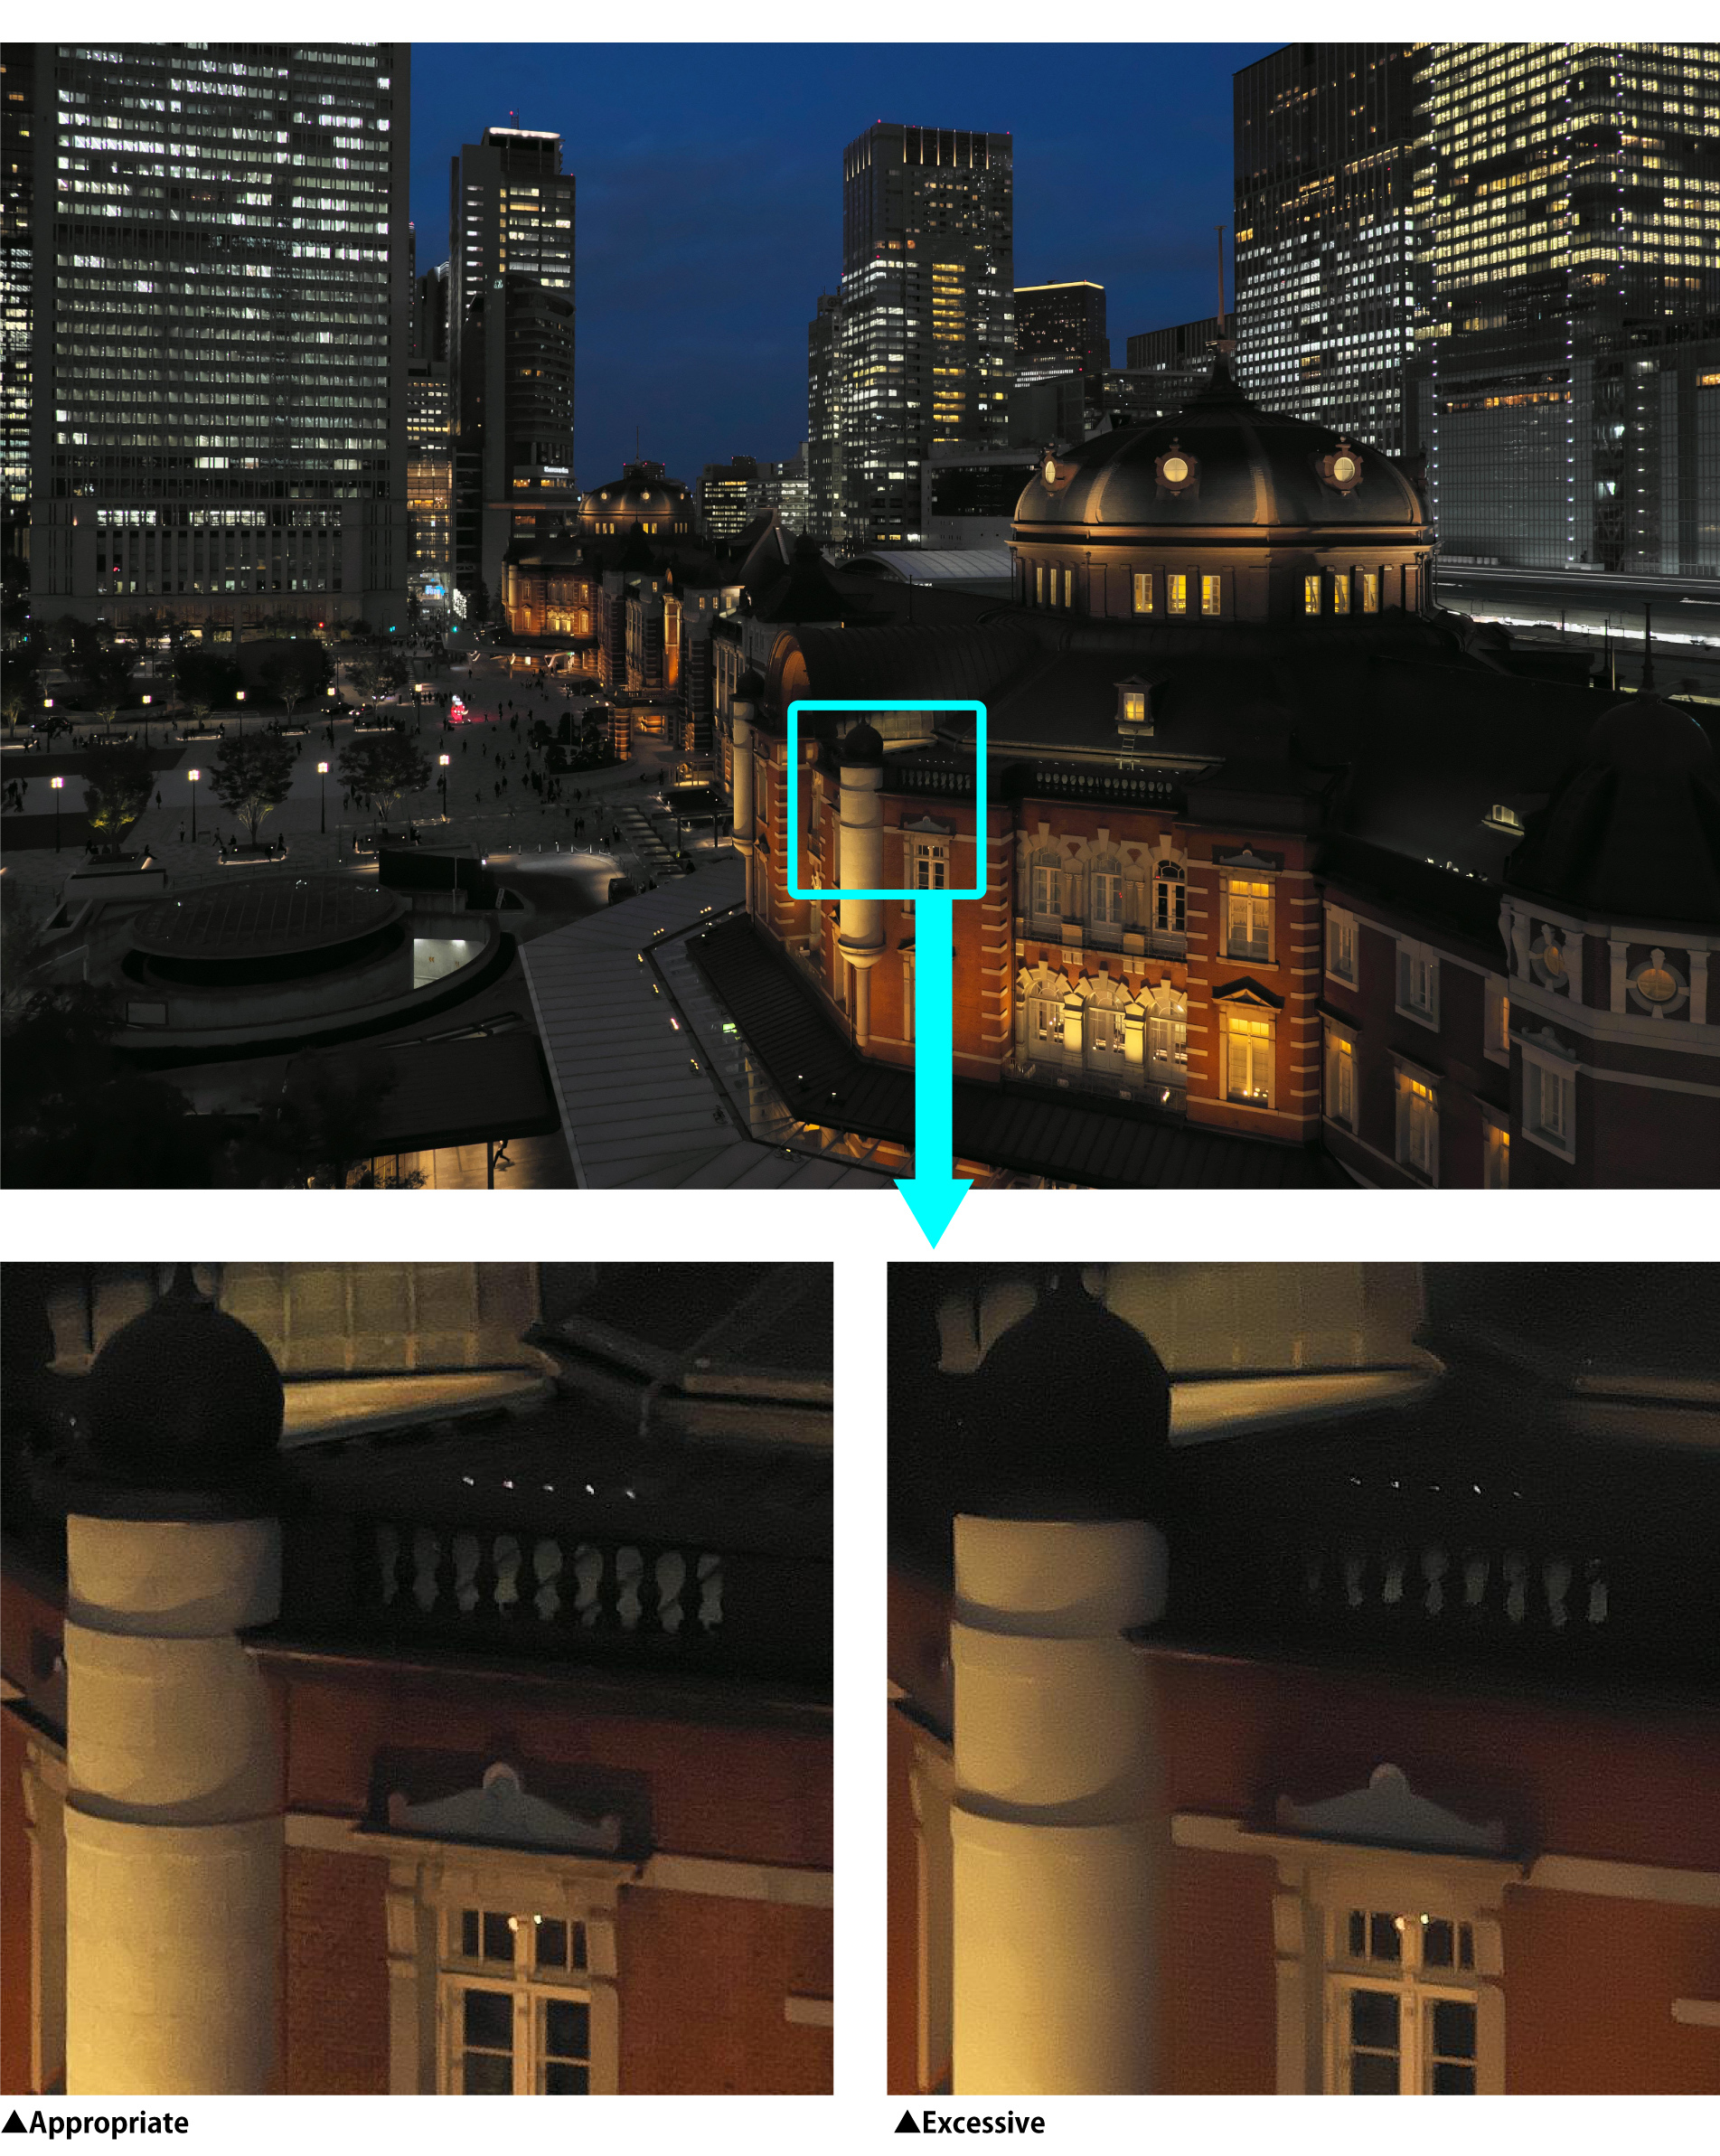
In this way, the relationship between the Smoothness effect and the image resolution is a trade-off (inversely proportional) relationship, so you need to make settings while observing these two balances. In addition, when you open a photograph taken with high ISO speed on the SILKYPIX, if you feel that the photo is poor (poor resolution, the picture looks blurred), it may improve by reducing the Noise reduction.
Noise Generation Mechanism
“Noise in the analog circuit” generated on the image sensor
The noise will be mixed up on the image sensor before “charge” is converted to “data.” The figure below is a conceptual diagram of the image sensor.
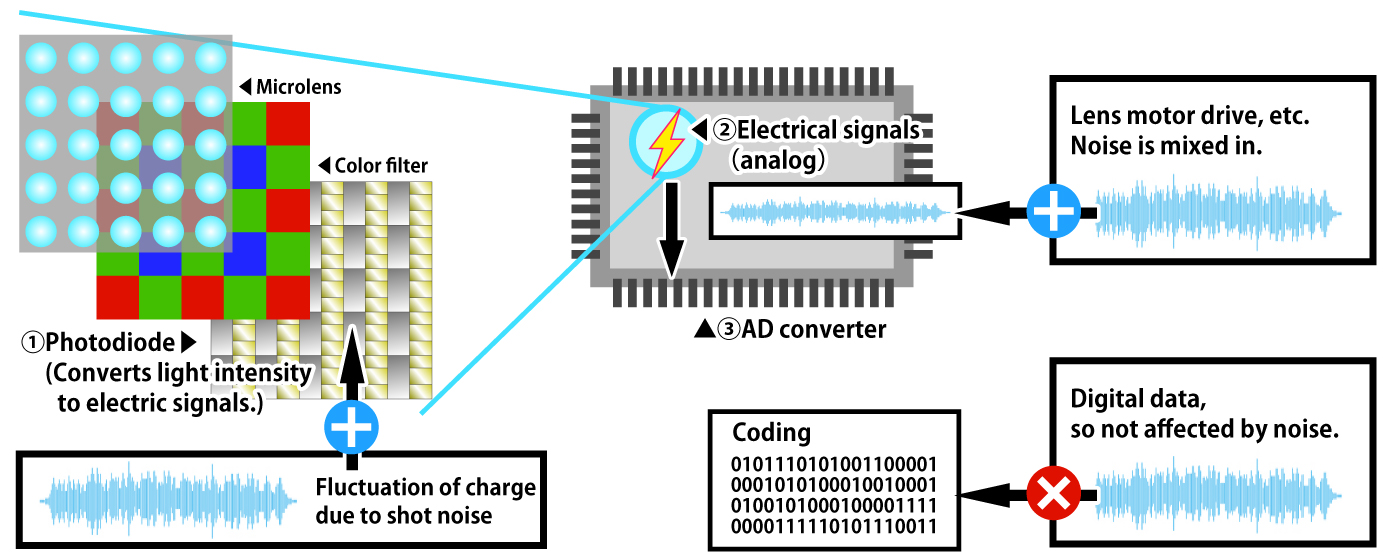
- Conversion of light to charge by a photodiode
Light passing through the camera lens is resolved into pixels by a microlens and color filter, and the intensity of the light is converted into an electrical signal by a sensor called (1) the photodiode. Even if 100 light is applied to the photodiode, the amount of light actually taken in is 99 or 101, which varies with each pixel. This fluctuation is known as “Shot noise,” which tends to have a particularly large effect in dark areas.
2. Transmission of electrical signals on the sensor
Electrical signals are transferred to (3) the AD converter through the transmission path on the sensor. At this stage, the data is still in the state of an electrical signal (analog), so it will be affected by external noise. For example, you can think of it as a situation like AM radio or analog television.
3. Digitization (coding) with an AD converter
The transferred electrical signals are converted into digital data by an AD converter located in the image sensor. Once the data has been converted, it will not be affected by external noise. However, noise mixed in (1) and (2) is also recorded as digital data at the same time.
- The difficulty of Noise reduction
In this way, RAW files contain more or less noise from the image sensor. It is possible to reduce noise by discriminating only the components of noise from this data and subtracting it. However, separating the components of the subject from the noise requires very advanced image processing technology, and each company has devised it.
Expanding photographic possibilities with high ISO speed shooting
From here, we would like to say that it is possible to create work that could not be done by combining “high ISO speed shooting” with “excellent noise reduction.”
Multi-Shot Noise Reduction
Noise reduction from a single photo typically uses neighboring pixel info to process noise. Apart from this, recent improvements in digital camera performance have resulted in noise reduction that combines multiple images taken sequentially to reduce noise.
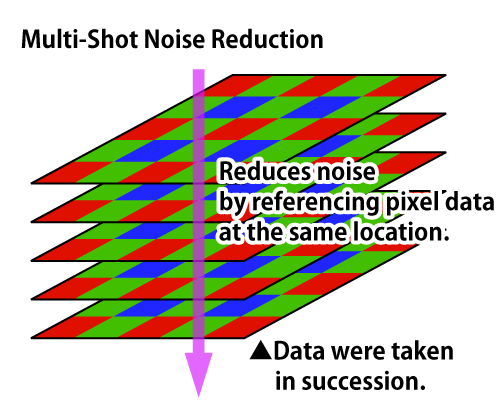
Since it is used for noise processing by referring to pixel information at the same position from several images, it is not only more effective for noise rejection than common (from a single image) noise reduction, but also has fewer side effects of blurring the picture. Rather, this processing method can improve resolution.
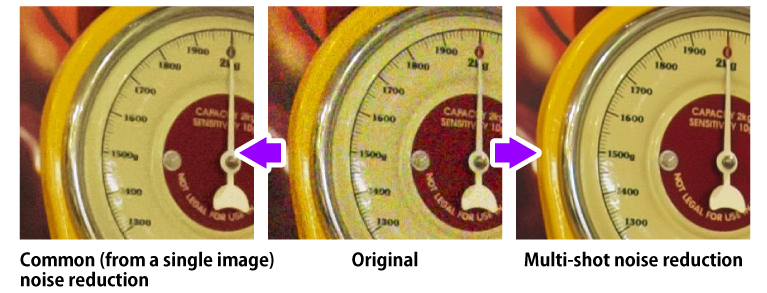
This is a noise reduction that is expected in the future as devices such as image sensors evolve.
- Multi-shot noise reduction with Image coincidence detection technology
In fact, multi-shot noise reduction using multiple images has traditionally been used for astronomical photography and other purposes. However, if the camera moves a little bit, it would not be able to compose properly.
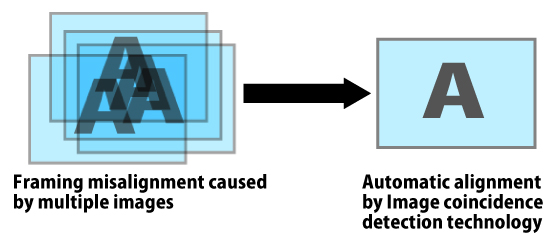
Therefore, SILKYPIX Developer Studio Pro10 can detect matching points of several images and perform composition to reduce noise while automatically aligning them. Multi-shot noise reduction can be performed even with hand-held shooting. Refer here to examples of the Compositing function and how to use it.
Should Blur or Noise be Prioritized?
In some cases, you may be needed to shoot dark scenes, such as indoor sports, activities, or nightly events. Of course, the shutter speed will be slower due to insufficient brightness. Also, many locations that are “Tripod prohibited” or “Strobe prohibited” cause blur to become an issue.
As long as there is no special intention to create a photo, blurring can lead to a deterioration in image quality. Sometimes, the problem of poor focus or poor lens resolution was a slight “camera shake” when shooting. Furthermore, image blur cannot be corrected fairly well during RAW development.
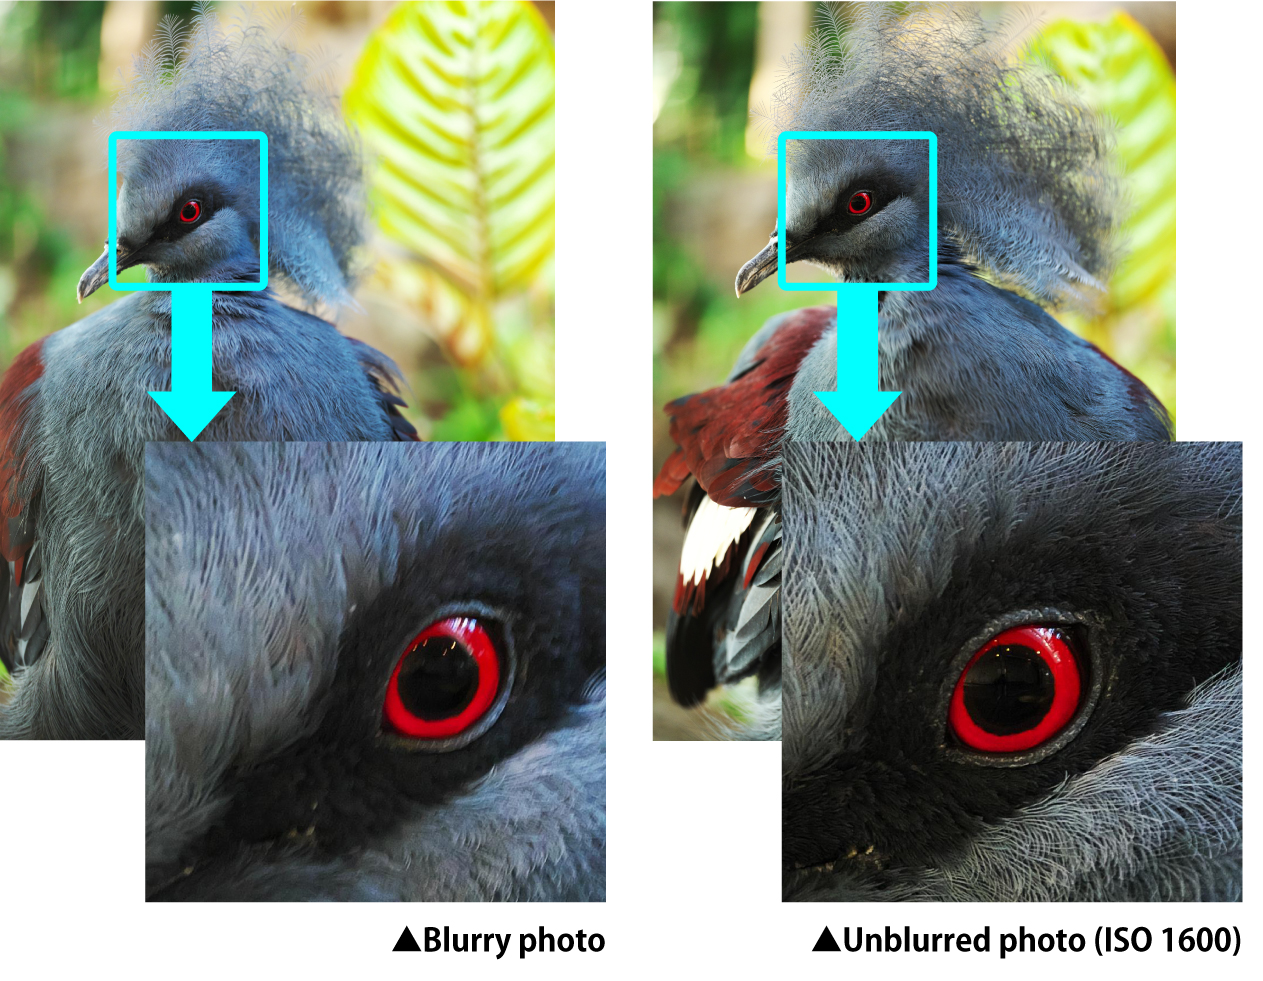
It is recommended that you increase ISO speed until the image stabilization shutter speed is reached, and then release the shutter at a high speed to minimize image blur. If shutter speed becomes faster, it will be easier to shoot and shoot at a higher tempo, so is it more likely that you are able to shoot better scenes.
When shooting at high ISO speed, noise can be adjusted with Noise reduction on RAW Development software to obtain a higher-quality photo. As a result, using Noise reduction’s high-performance RAW Development software increases the possibilities of your photos.
Slow shutter with a tripod or high ISO speed hand-held shooting?
For example, if you use a tripod to fix the camera in place under any dark scene and use the slow shutter mode, as shown in the photograph below, the subject will not be blurred by camera movement or subject movement. Therefore, there is no need to increase ISO speed, high-quality photographs.
However, if the subject is moving in a dark scene, the shutter speed will not rise at low ISO speed even when the camera is fixed on a tripod, which increases the chance of subject blur. To avoid camera shake and subject blur, adjust ISO speed to obtain a shutter speed that will allow you to take photos while holding the camera.
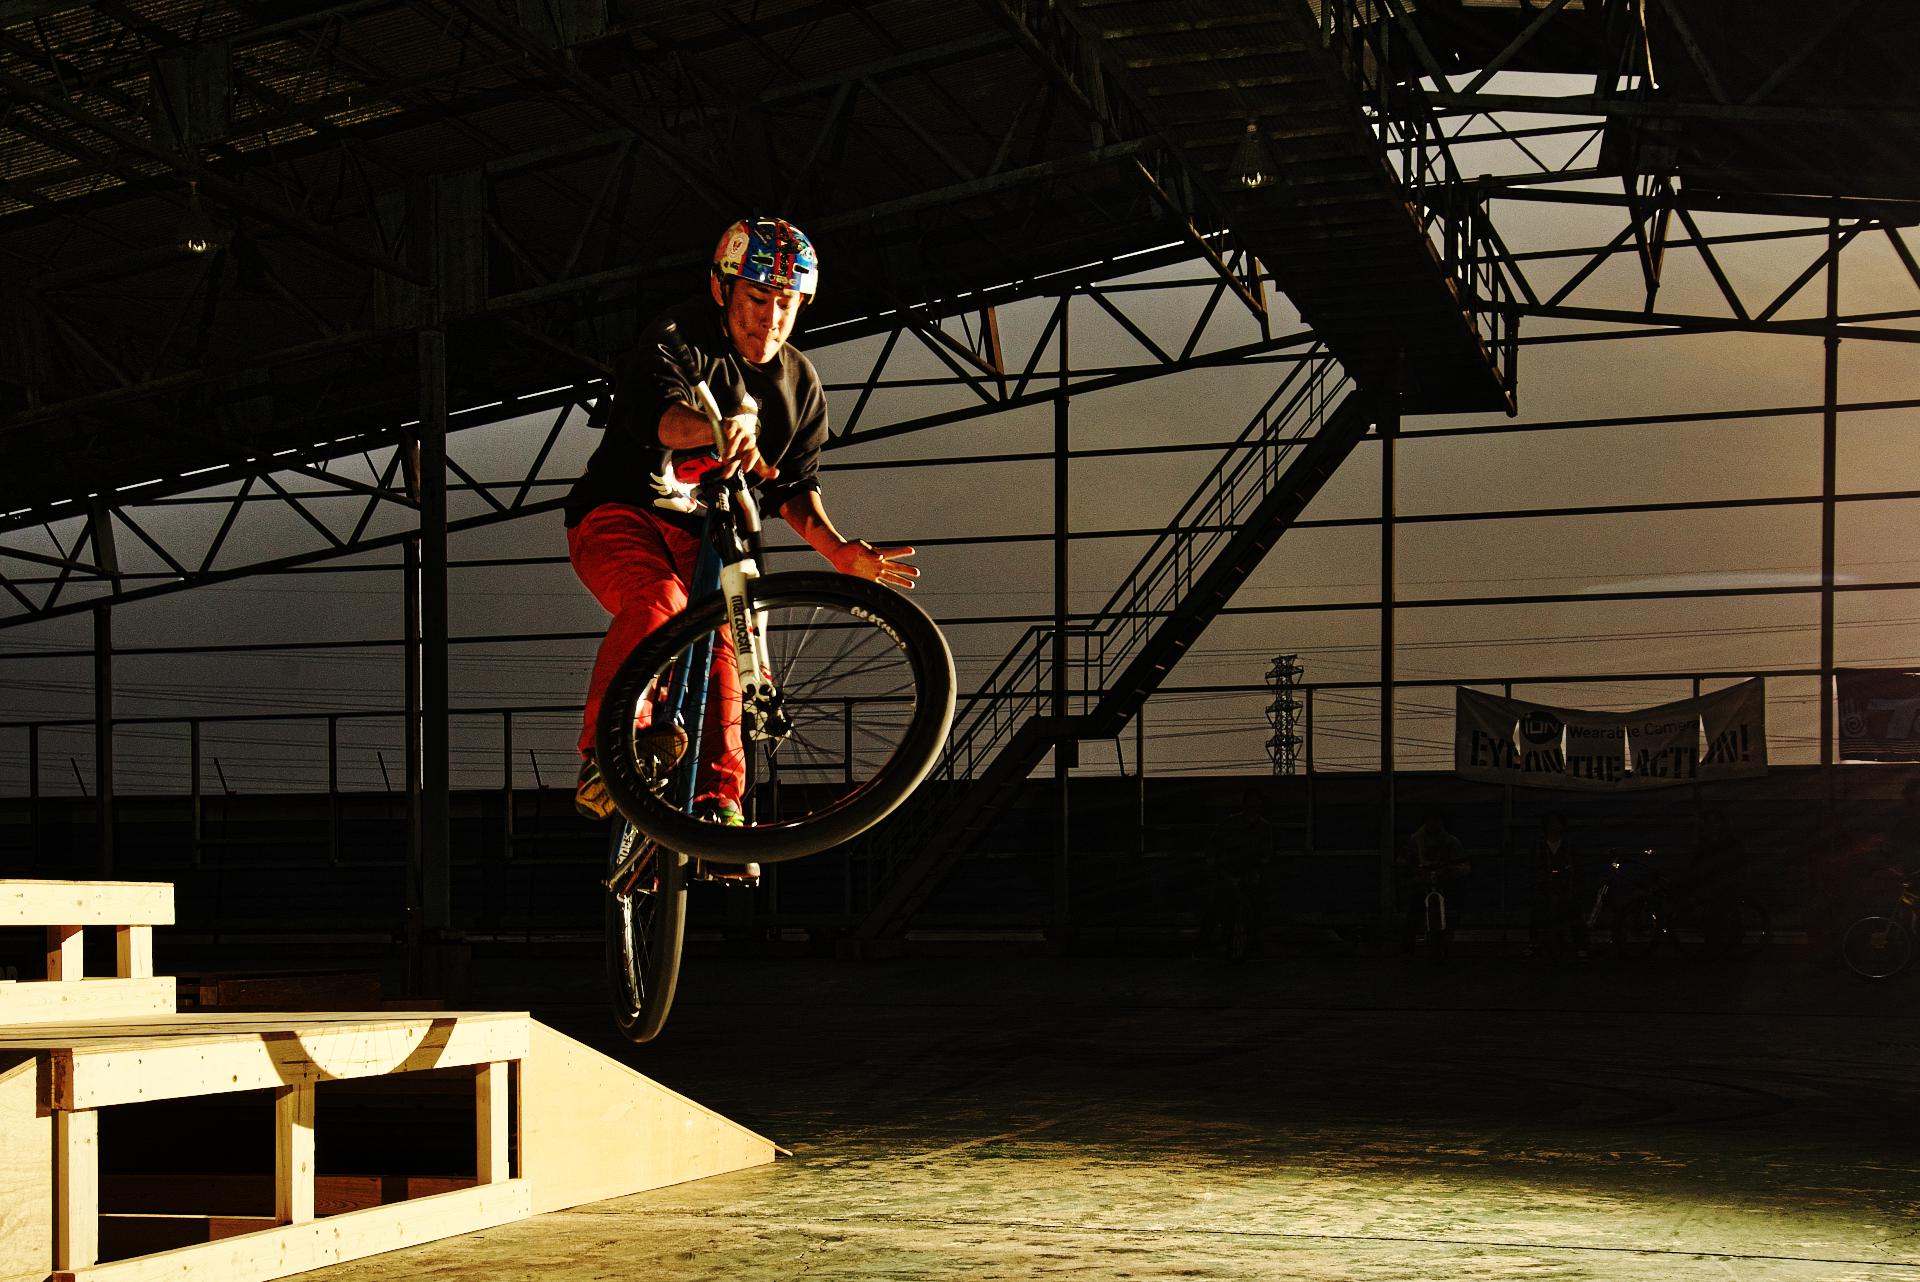
High ISO speed allows for a new field of photography called “Night motion photography”, making it more familiar to take photos in dark scenes. Noise reduction is a key element of this process. In addition, high ISO speed + high-speed shutters are expanding the range of expressions unique to “Show at the Instant of a Subject” photographs in bright areas, particularly fast-moving wild birds and sports. Why don’t you take on the challenge of taking photos of scenes that everyone has been blurring and giving up?
SILKYPIX
The SILKYPIX series is a series of RAW Development software produced in Japan that enables high-quality editing of RAW images taken with digital cameras to produce beautiful pictures. This product is compatible with the RAW files* of camera manufacturers.
It is also supported by many professional photographers and photographers.
In addition, many camera manufacturers have also adopted the software packaged with cameras.
*For more information about supported cameras, please refer to the details of each product.
Check out the video for basic operation instructions!
Useful Information