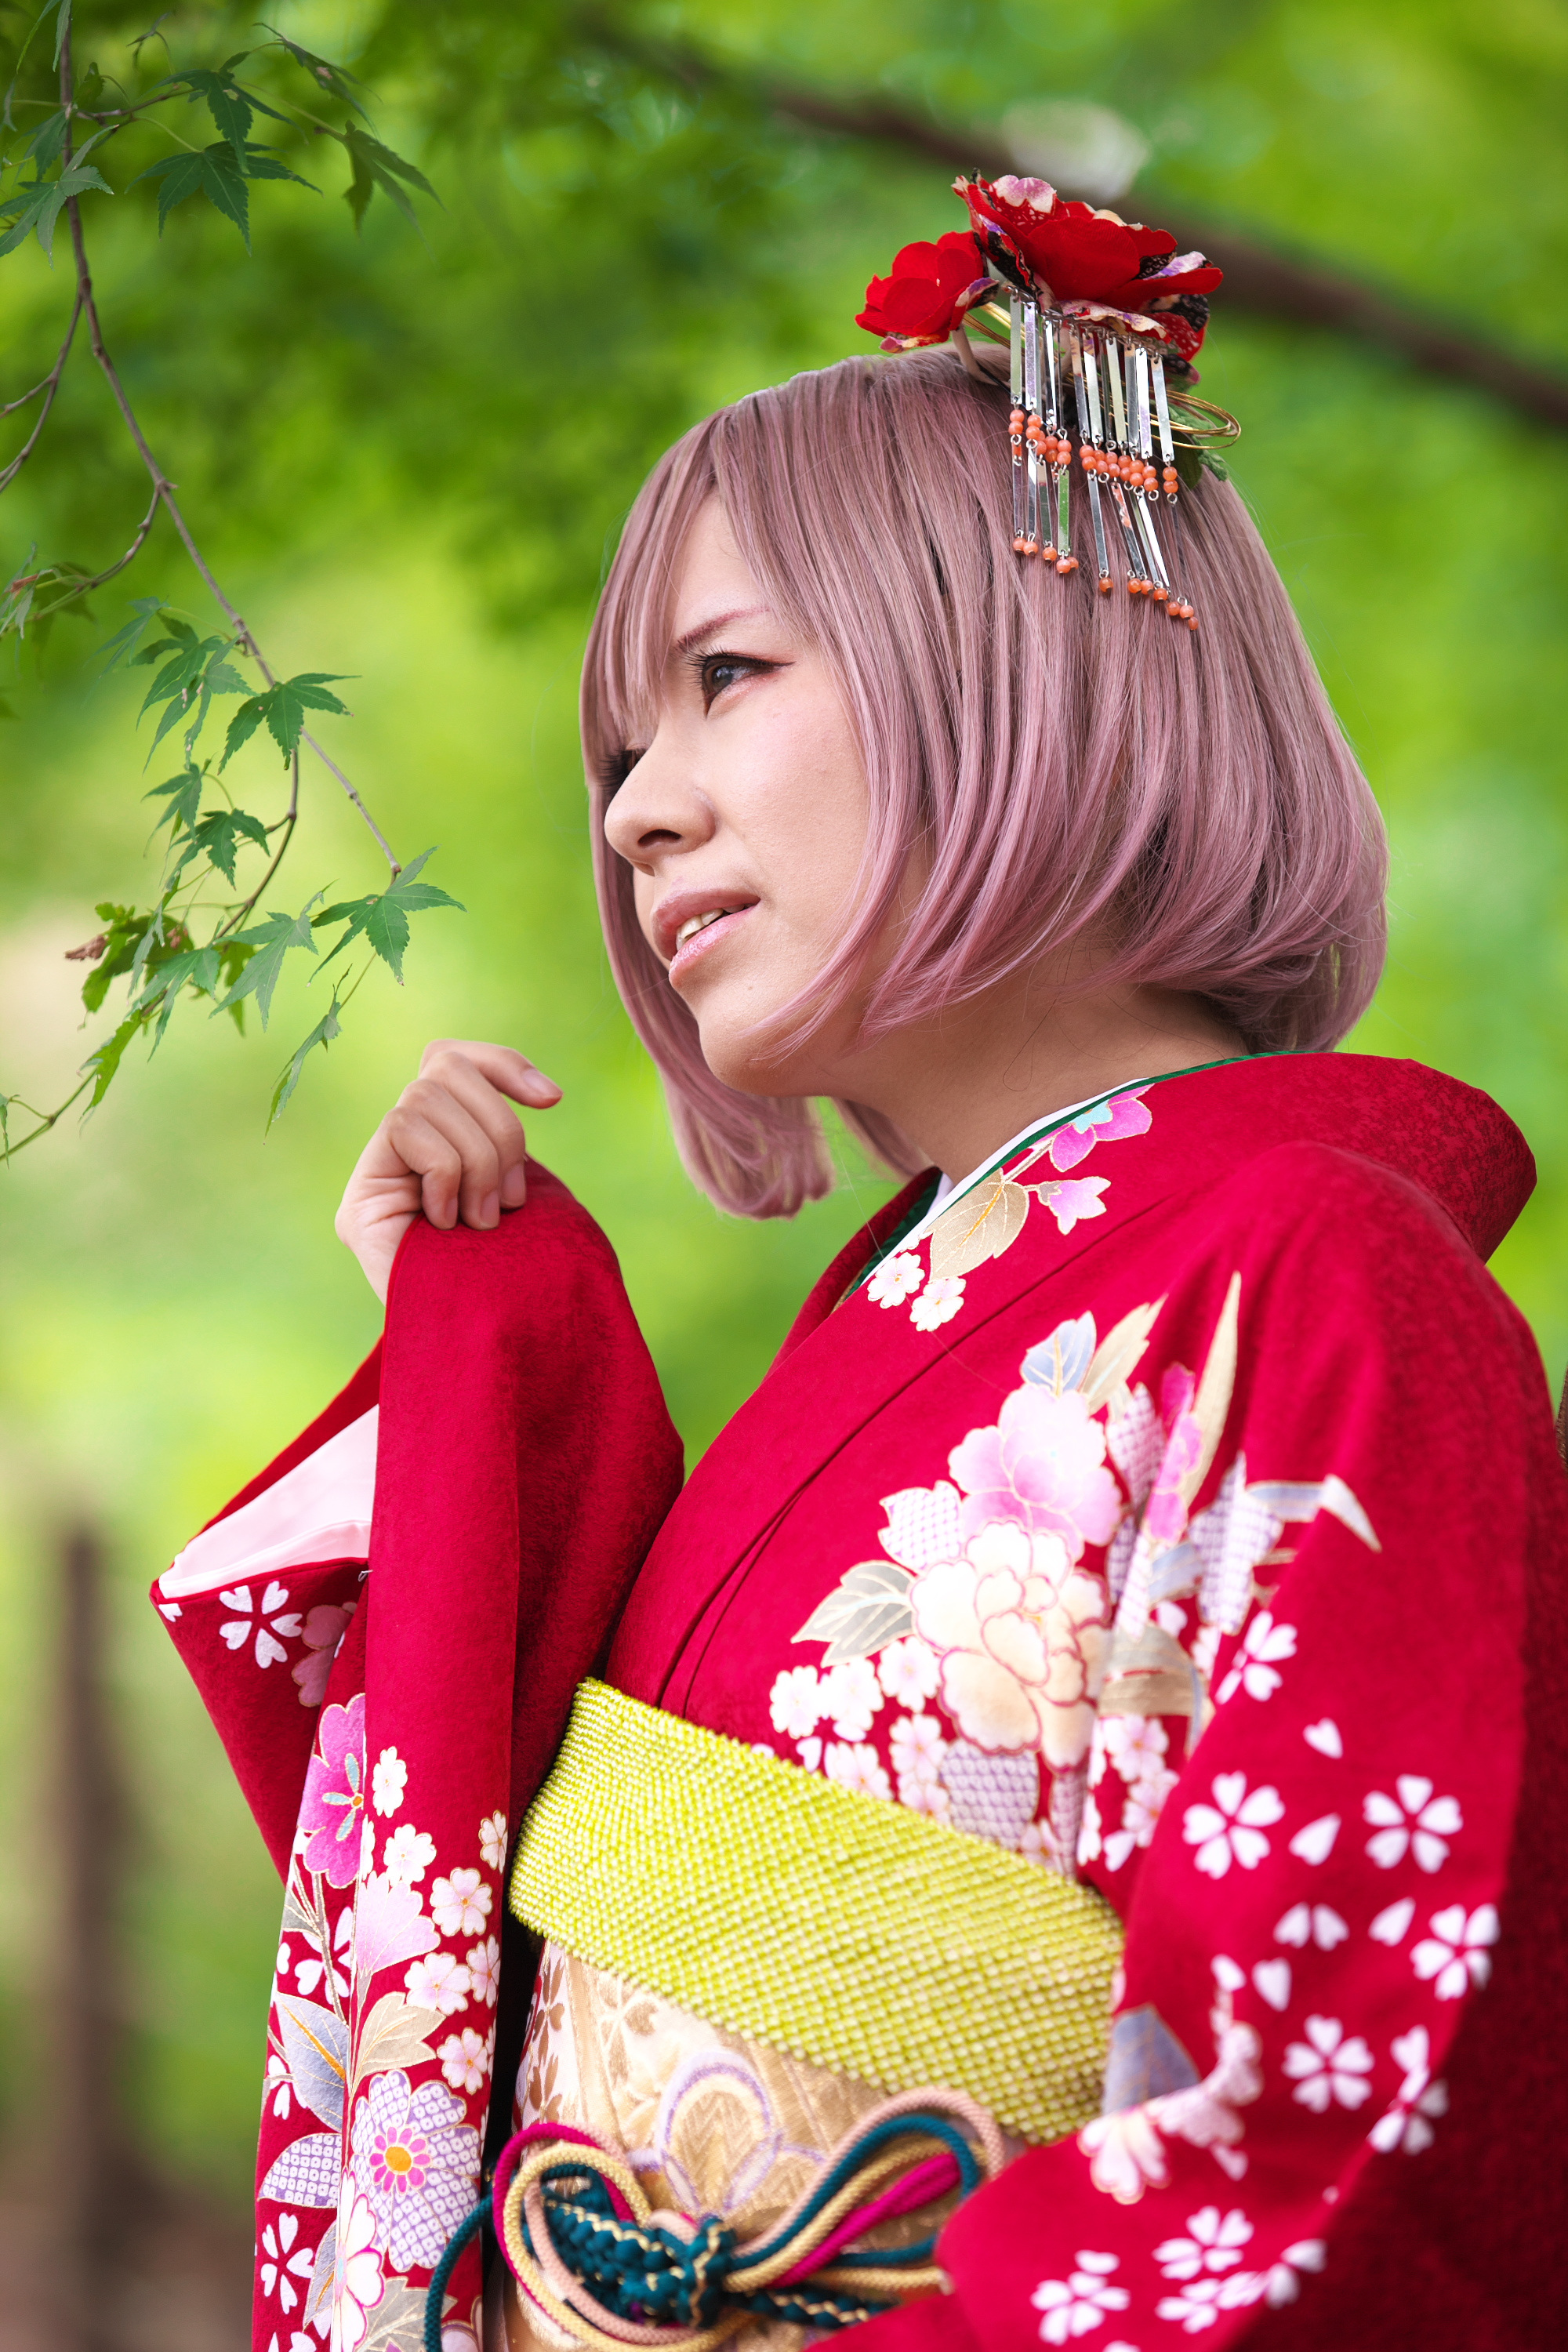
The Cosplay is dressing up in the costume of a character. You know, Cosplay photos has become more familiar these days. The Cosplay photos are something like one of the portraits, such as pose, clothing, and commitment to quality the skin.
This time, we introduce you to SILKYPIX Developer Studio Pro10’s recommended functions on the subject of such Cosplay photos.
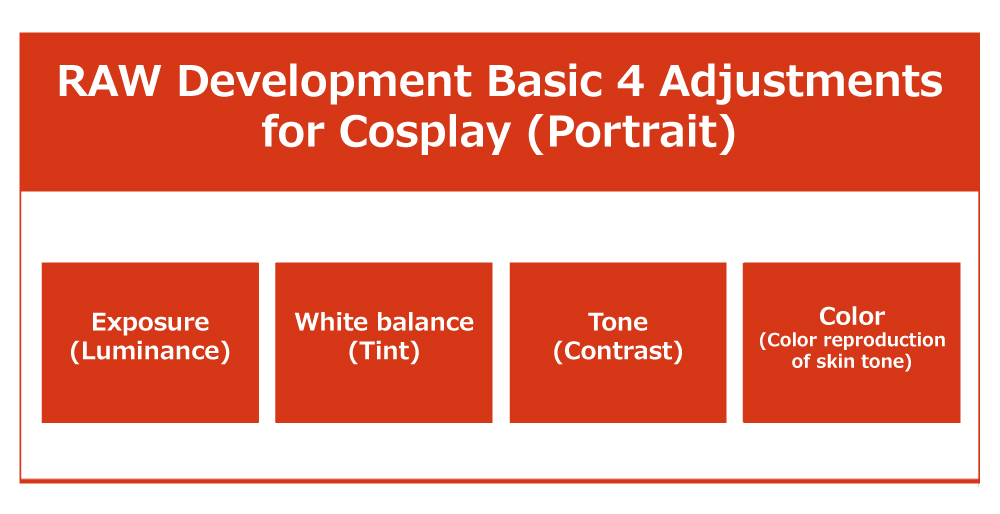
In this [Part 1], we introduce some of the functions recommended such as the “Basic 4 Adjustments” Exposure (Luminance), White balance (Tint), Tone (Contrast), Color (Color reproduction of skin tone).
We think there are many people like shooting in JPEG. However, We would like you to experience a “RAW Development” that can be closer to the work that you image. For this reason, this time, photos are taken with RAW and adjusted with the Professional edition.
For basic information about RAW Development, you can read the “Basics of RAW Development.”
If you haven’t tried SILKYPIX Pro10 yet, you can use it for free for 30 days! Click here to download.
We think it will be a reference for finishing not only for Cosplay but also for general Portraits as well.
Four basic adjustments to make skin tone look beautiful
1. Basic adjustment is important.
If you look at the RAW without adjustments, you may find that it is not bright enough or that the skin color looks dull and muddy. Before you proceed with the fine-tuning process, first check that the four basic adjustment items for the entire image.
Four basic adjustments in Cosplay and Portrait photos are: Exposure (Luminance), White balance (Tint), Tone (Contrast), Color (Color reproduction of skin tone).
These four items can be set on your camera. However, it is difficult to set all of these on the scene of the shoot in accordance. The tempo of taking photos of people is very important for bringing out good facial expressions, isn’t it?
For RAW shooting, you can adjust those at RAW Development without image deterioration later on. So, You can focus on shooting. This allows you to shoot smoothly without having to wait for the model with the camera settings.
Now let’s take a look at how the image changes just by adjusting the four basic adjustments.
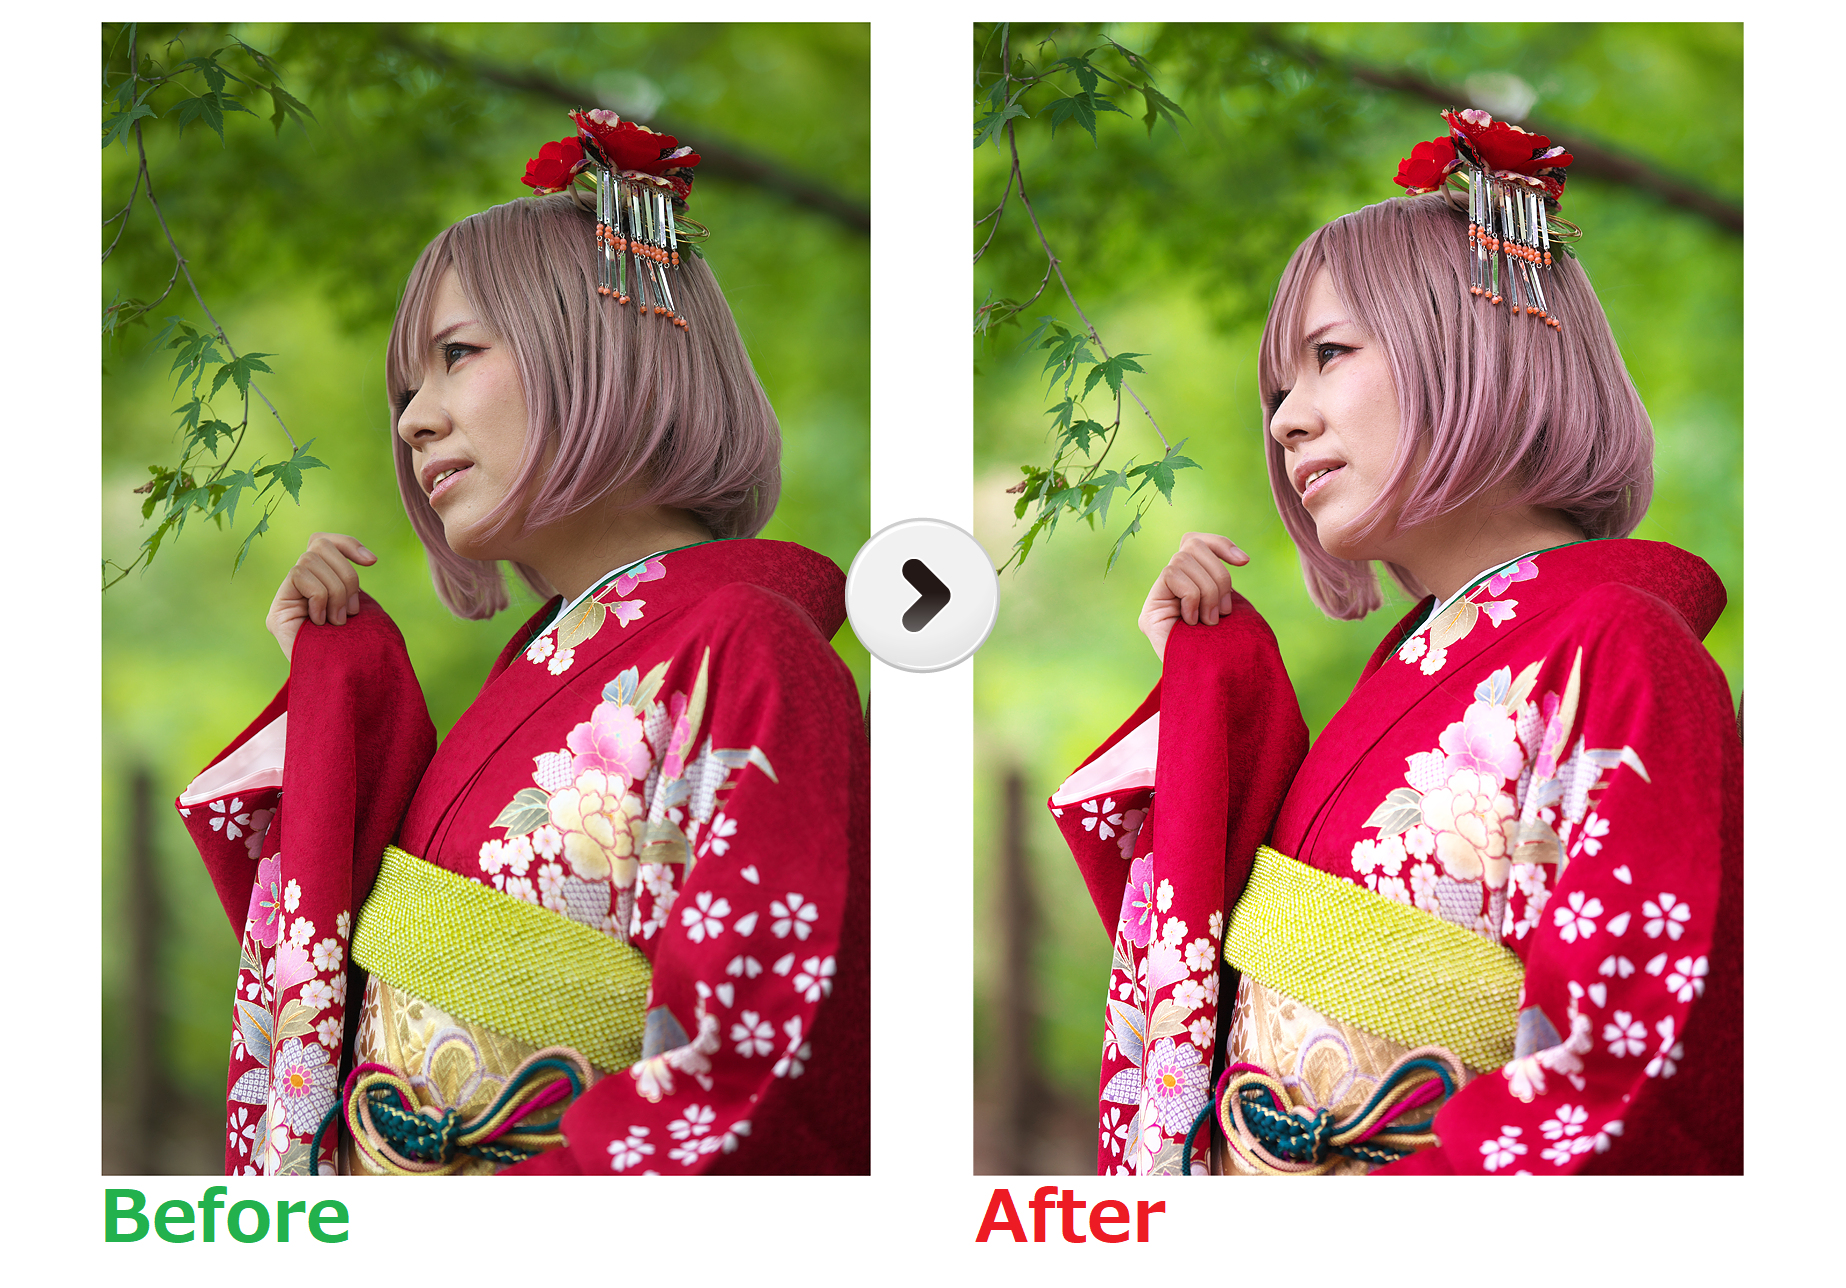
After adjustment, cloudy flesh tone skin became bright. The colors of Kimono and hair, as well as the green background, have also become vivid.
I’m curious about how you adjusted it, right? This section describes how to adjust the 4 basic adjustments and the points of the adjustment.
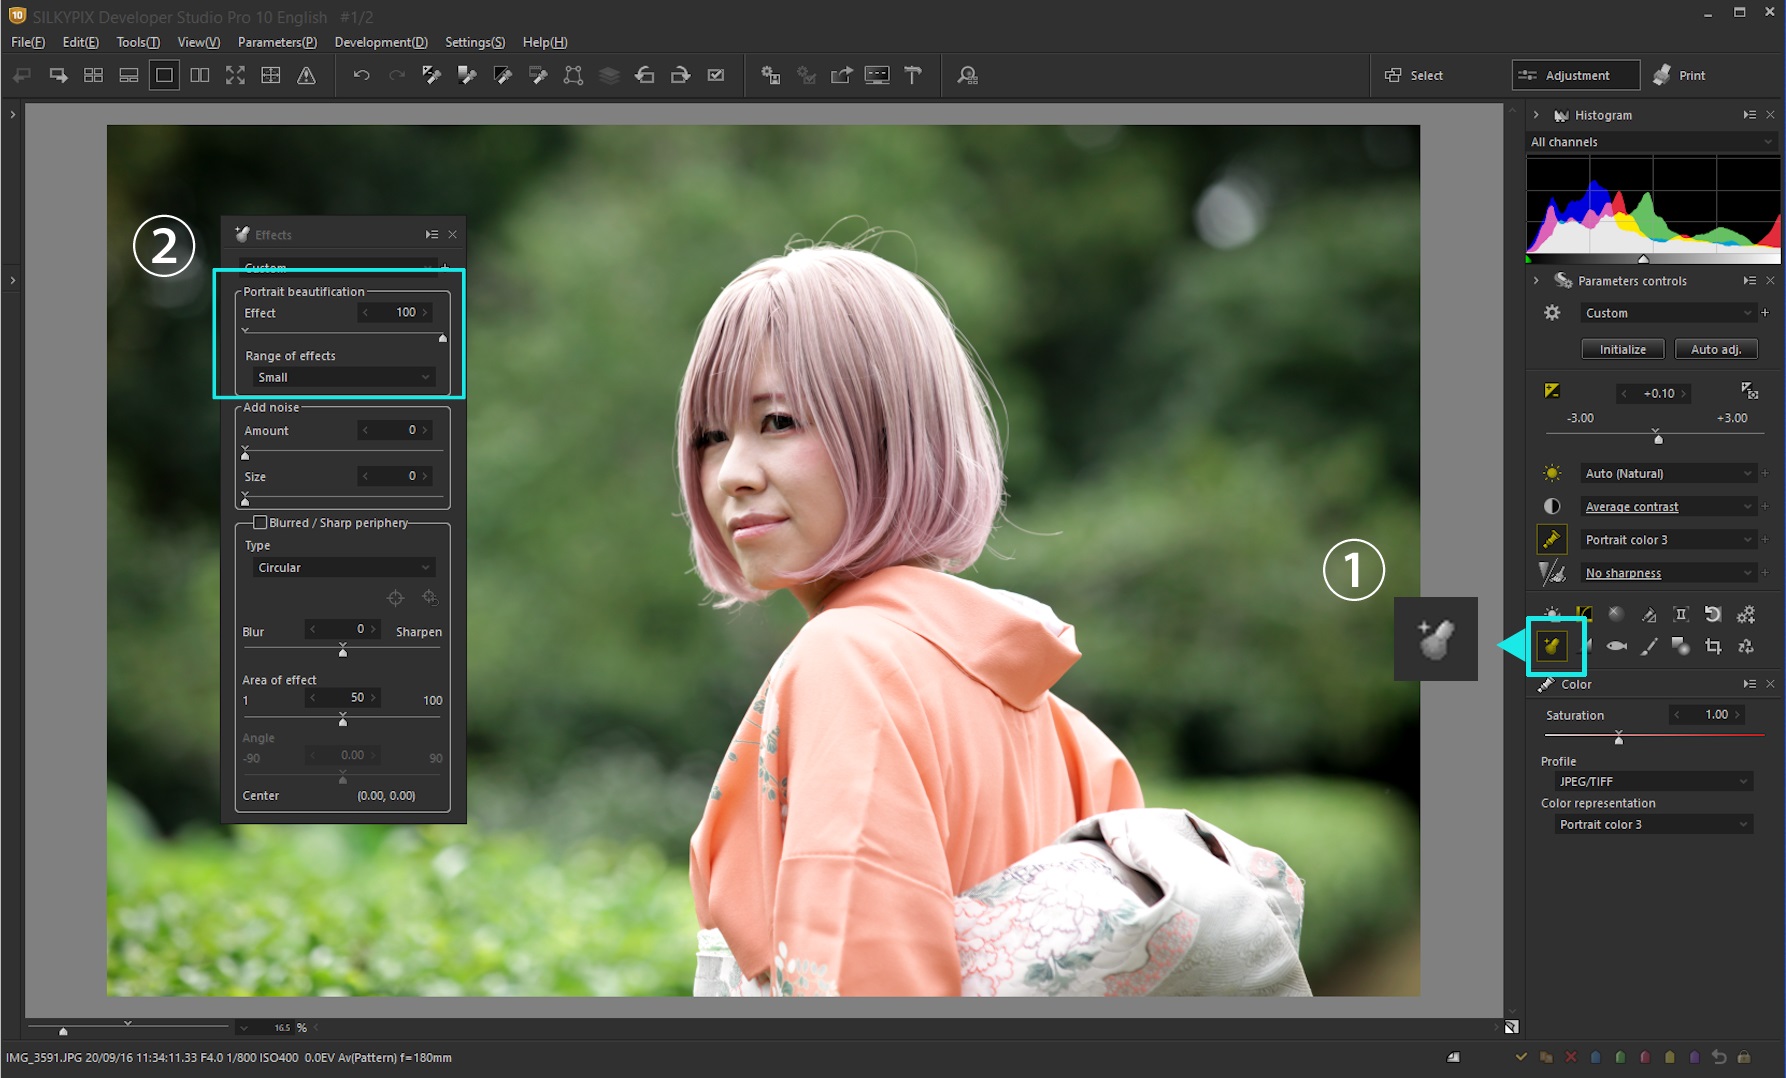
2. Use the “Skin color tool” (Exposure Bias and White Balance)
The “Skin color tool” is a function that allows you to adjust Exposure and White Balance automatically to achieve the desired flesh tone by specifying the flesh tone on the preview screen. The “Skin color tool” is located on the White Balance tab.

- Click the icon for White Balance.
- The tabpage in (2) switches to White Balance.
- Clicking the “Skin color tool” icon changes the mouse cursor to a eyedropper.
- When you specify a flesh tone range from the image, Exposure and White Balance settings are automatically set so that the flesh tone looks clean.
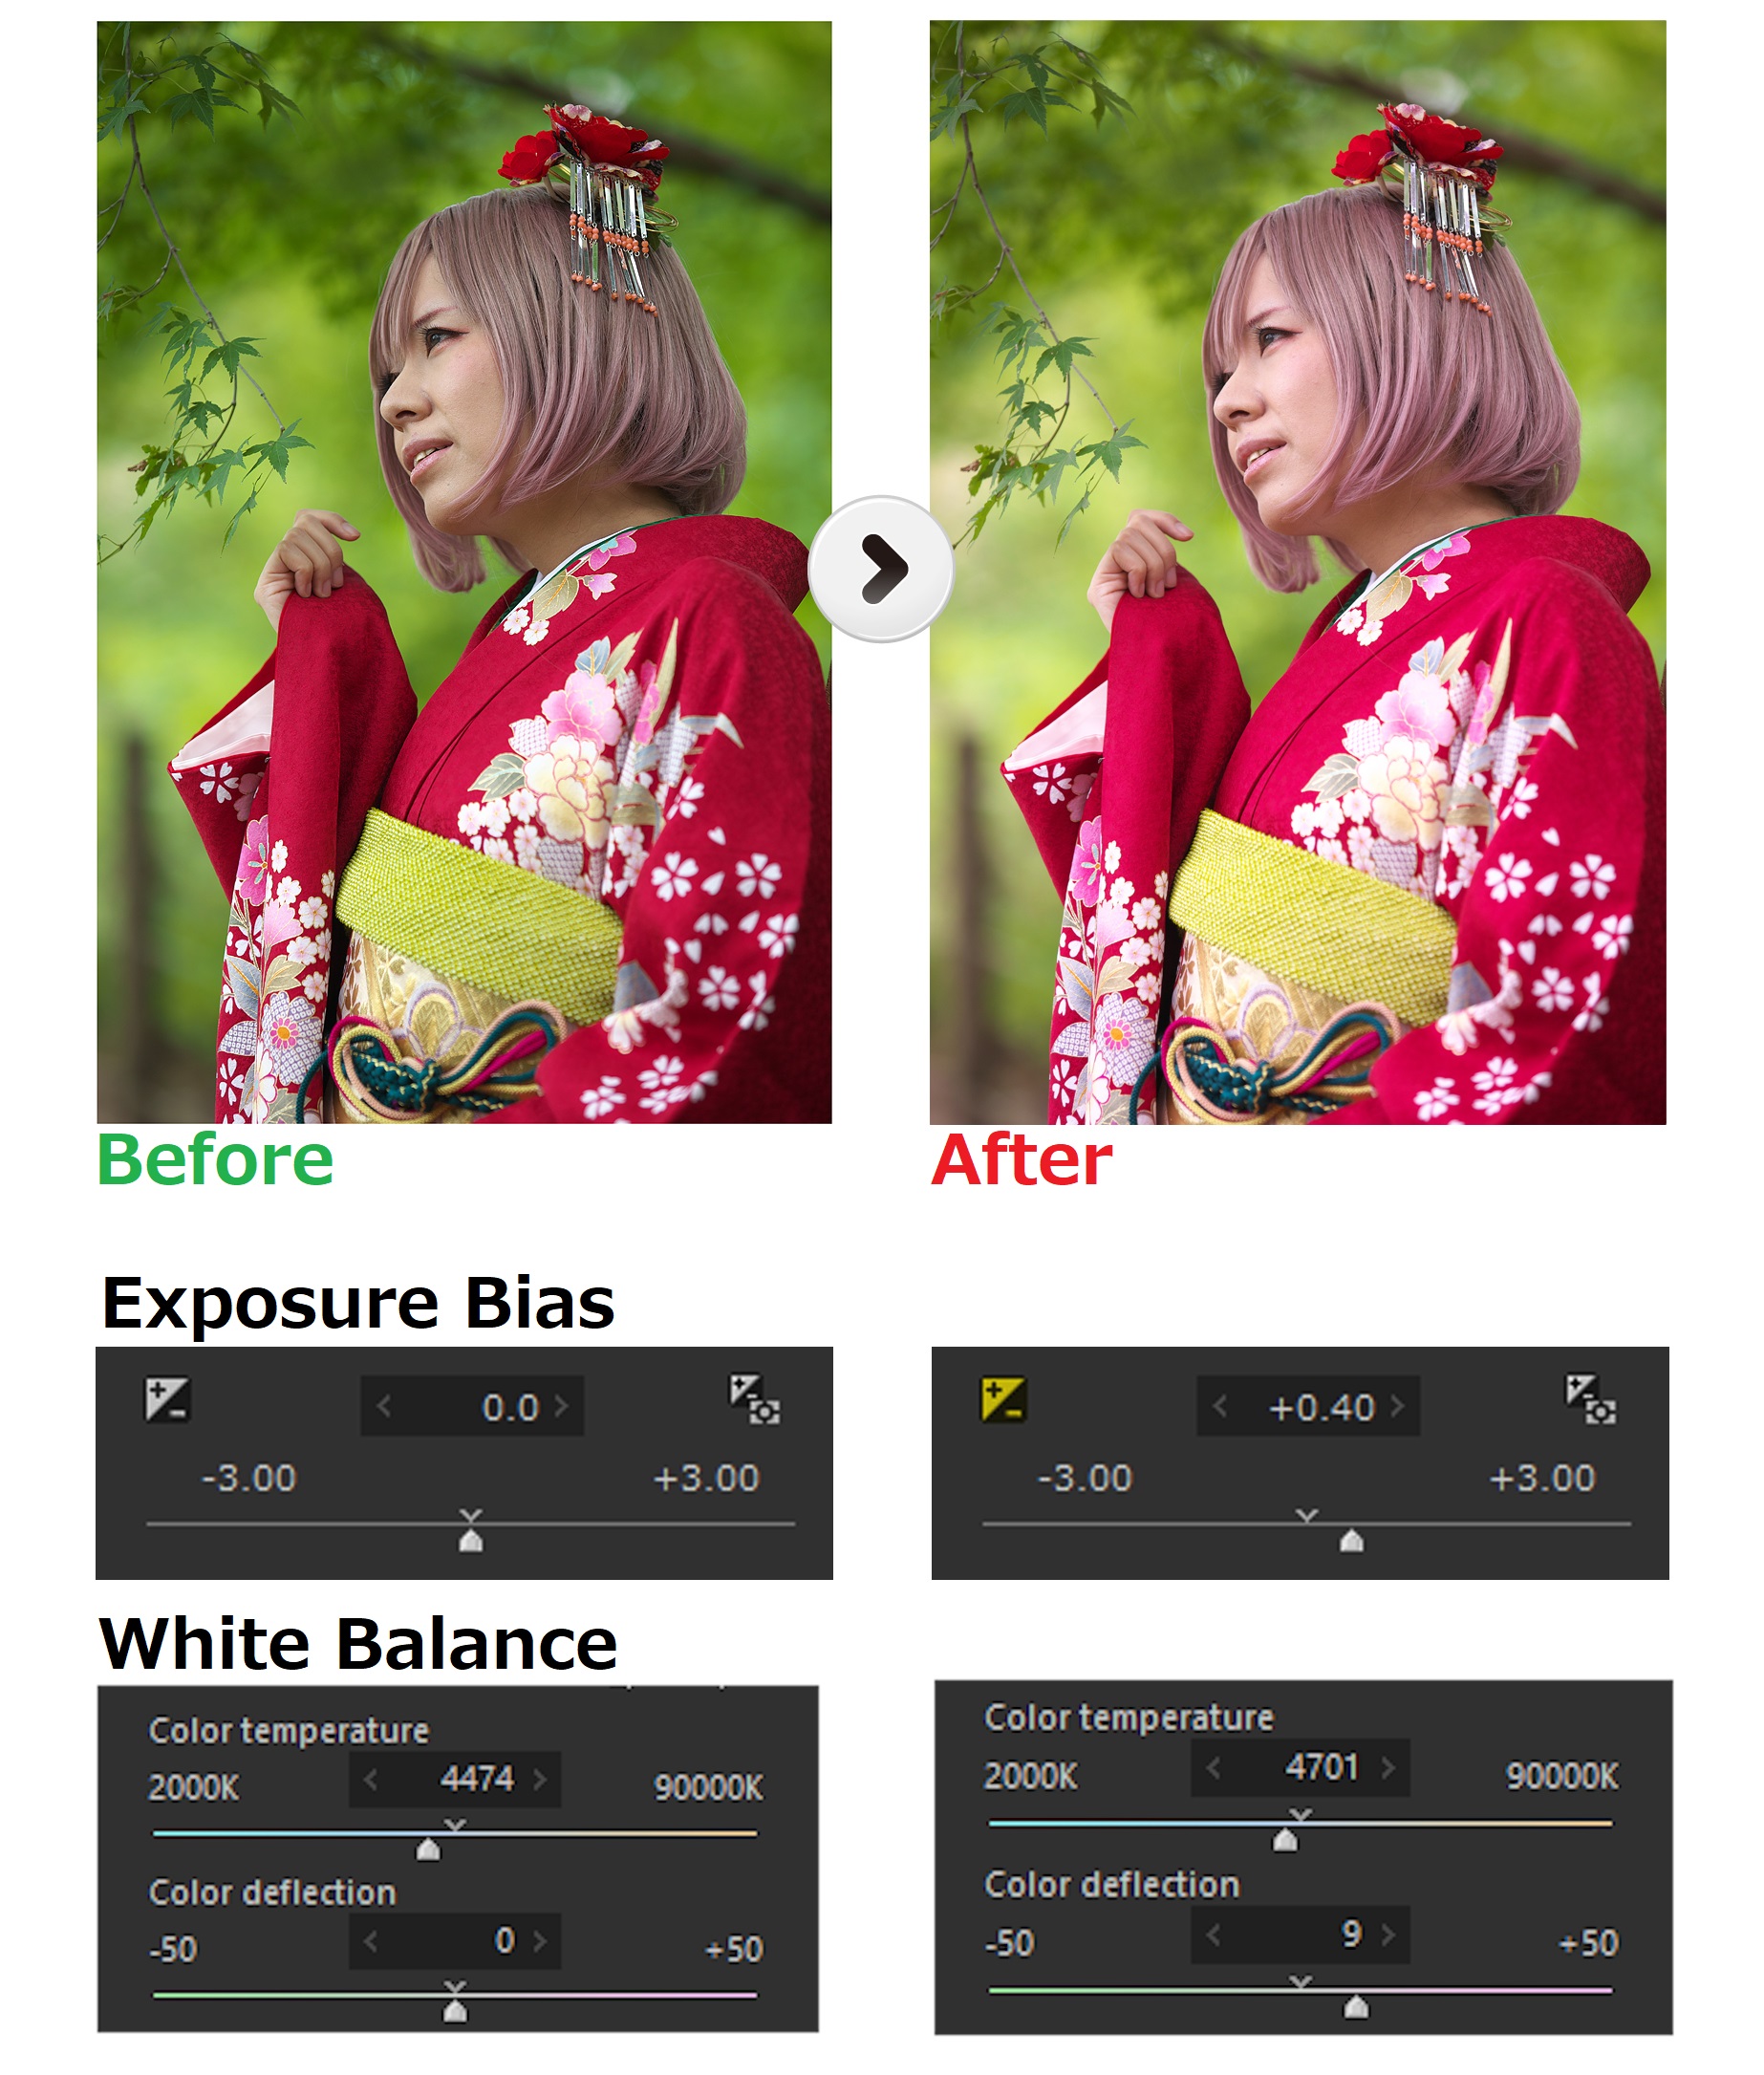
In the case of this image, the green light transmitted by the tree leak date is hitting the face. This resulted in a green tint, which caused the color to become cloudy.
Skin tone is susceptible to translucent or reflected light, so even if you shoot on the lawn, it will be covered in green in the same way. Also, bouncing light with the strobe may be affected by the wall color. Even in such cases, you can easily match Exposure and White Balance by using the “Skin color tool.”
One Point
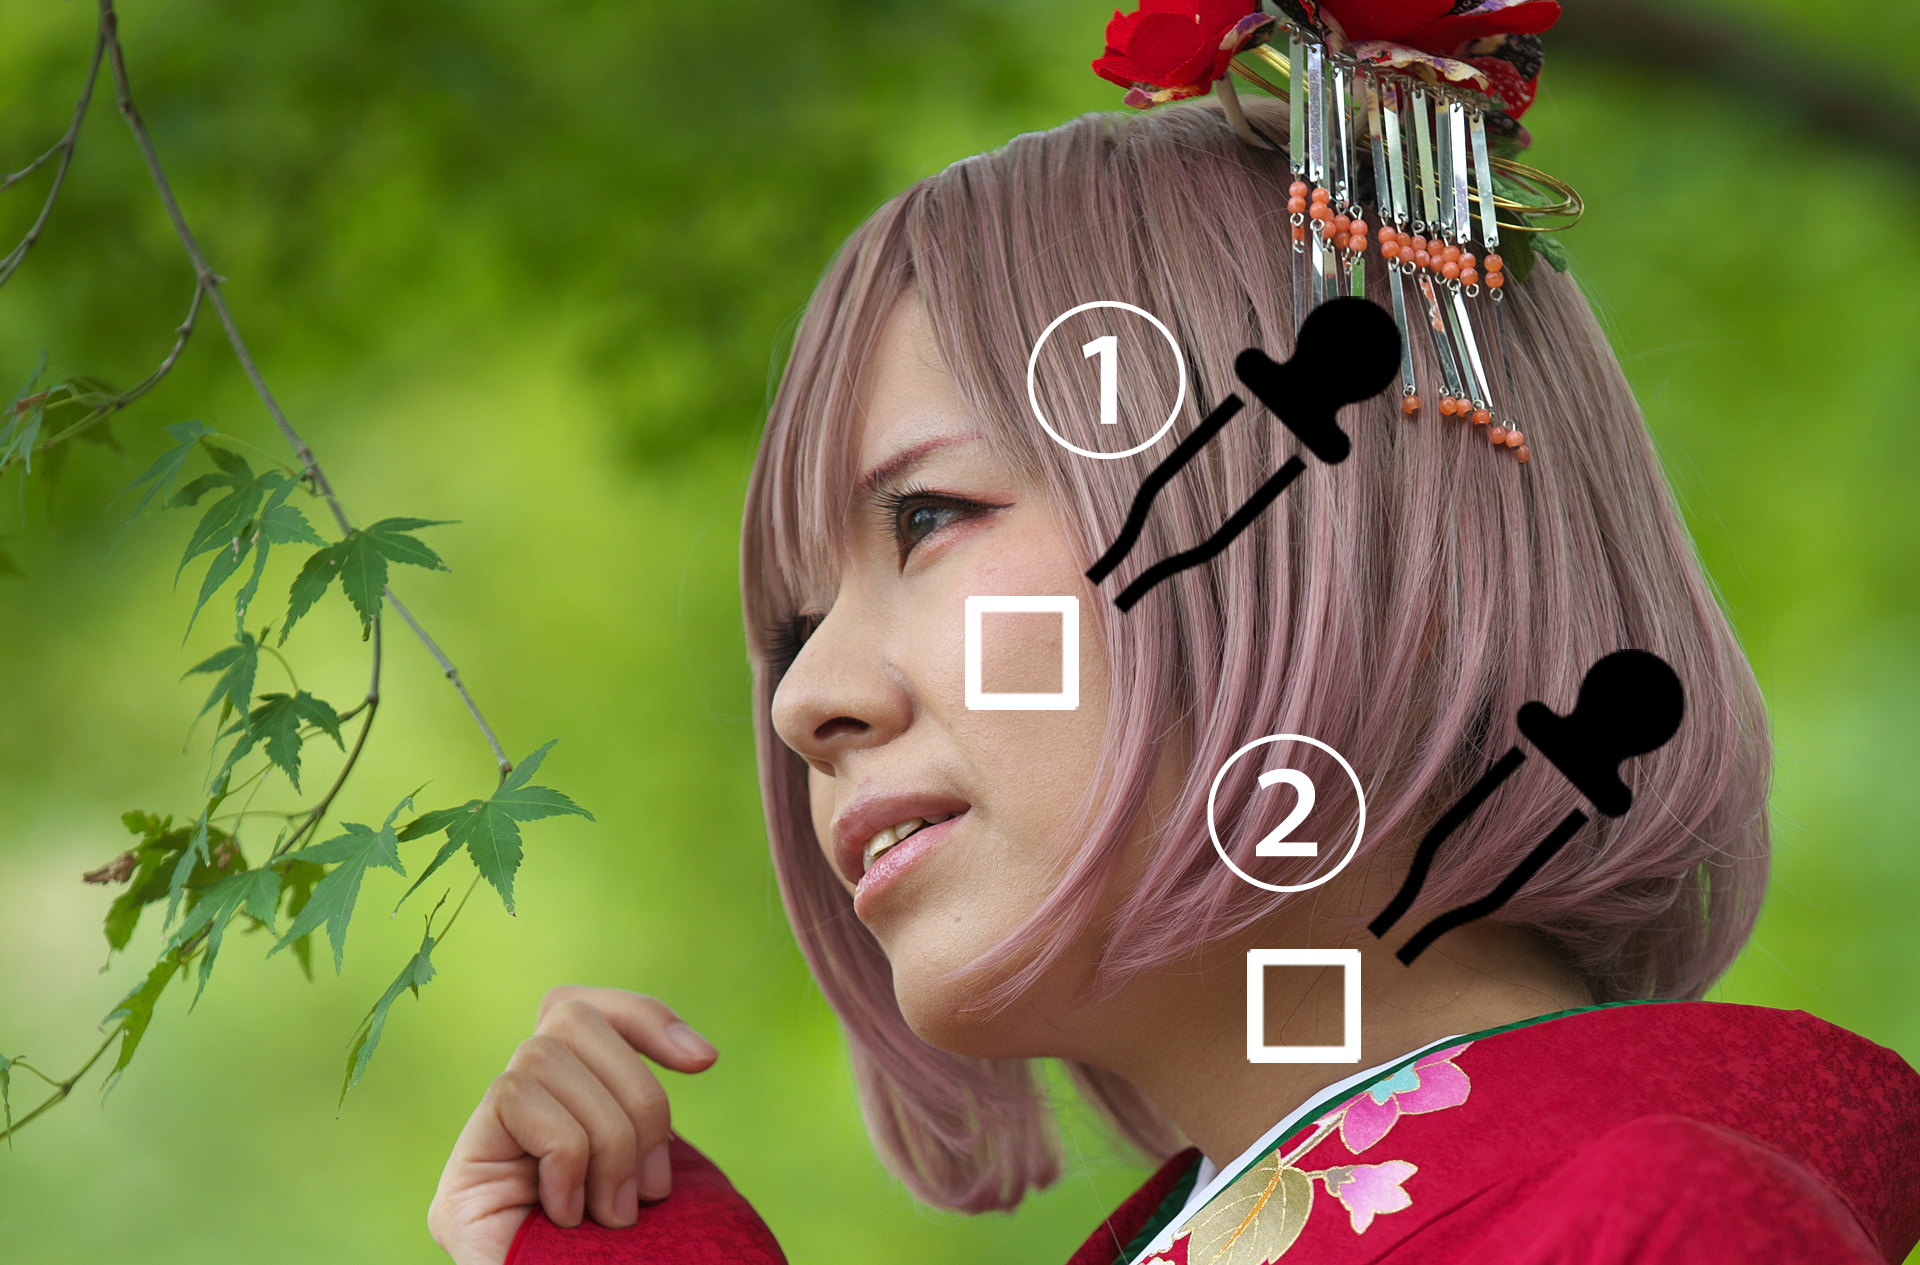
If you specify the flesh tone around the face in (1), it may be affected by the decorative color such as teaks or foundations, and the desired result may not be obtained (red or green will become strong). For this reason, we have designated the area around the neck without makeup (2) this time.
3. Tone (Contrast)
The Tone, also commonly referred to as Contrast, adjusts the brightness and darkness of an image.
The Tone can be adjusted further with the “Contrast” slider in (2) after selecting an item that is similar to your preference from the Tone tastes in (1).
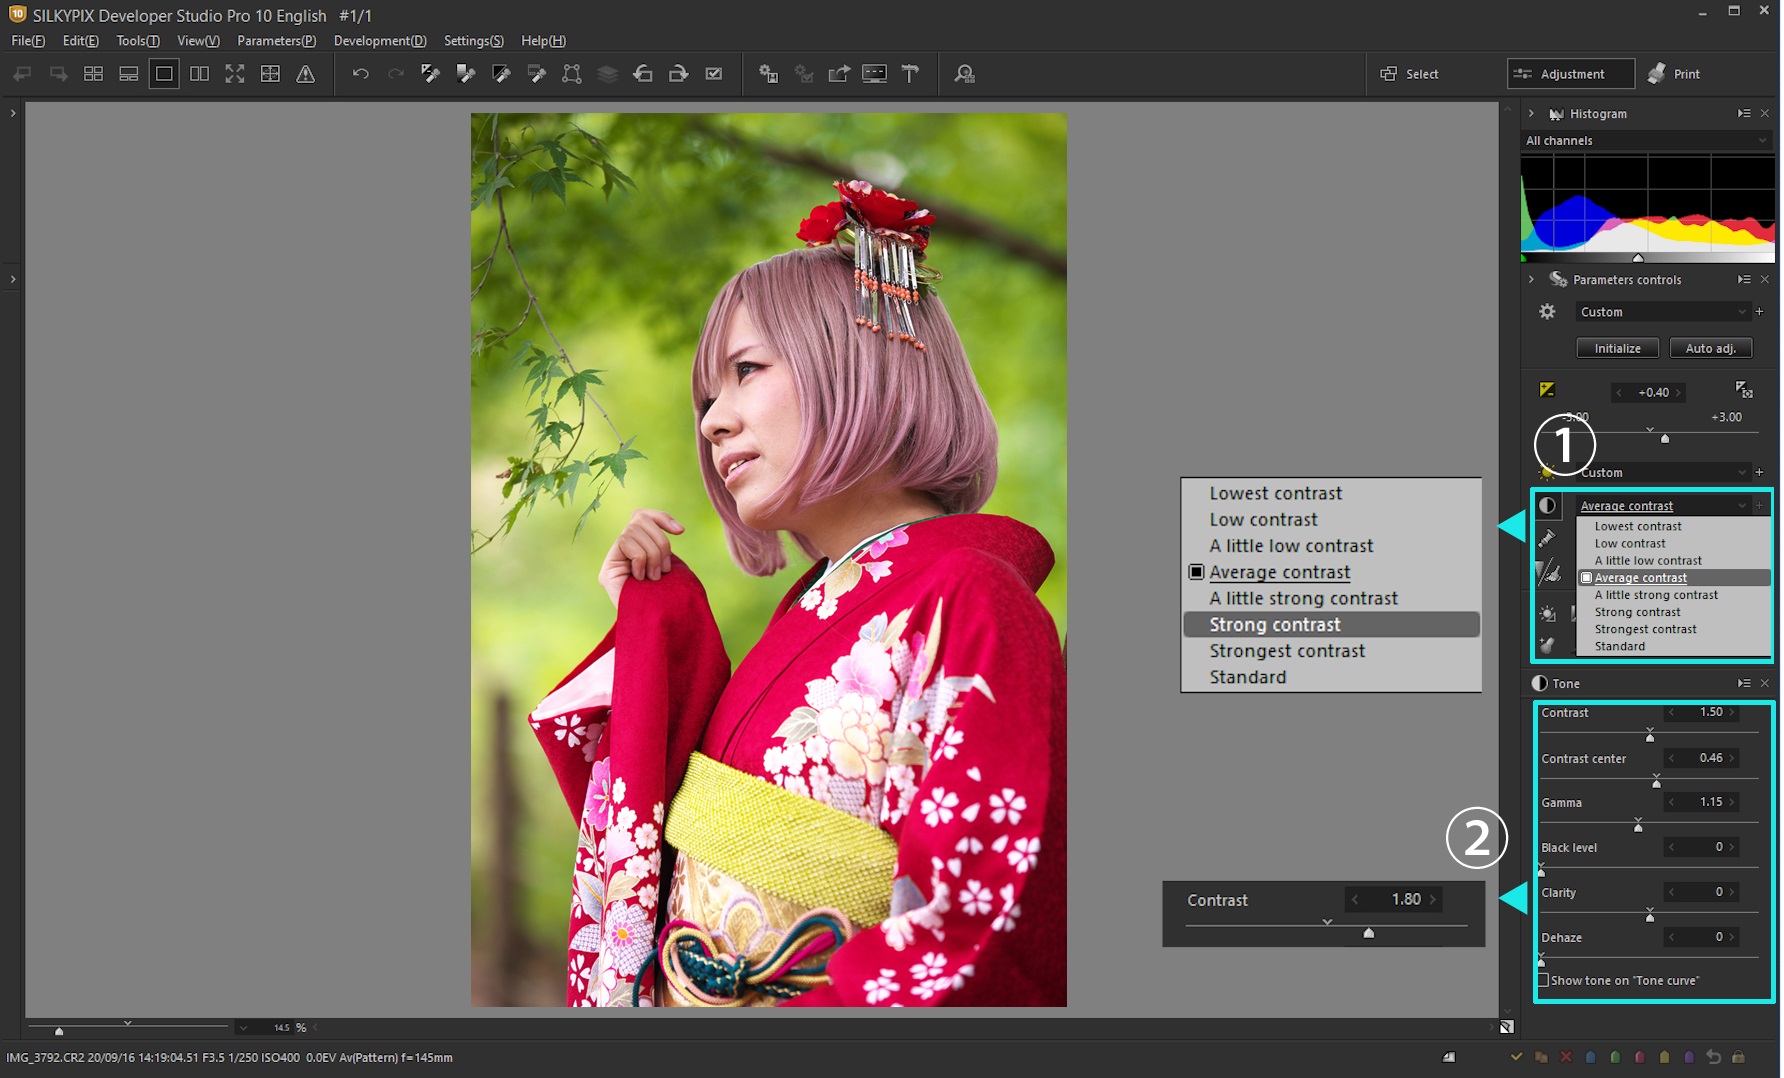
- Strong contrast
The difference between light and darkness is large, and the result has a clear three-dimensional effect. Also, the color appears vivid.
- Low contrast
Reduces the contrast between in light and darkness, resulting in a softer image. It looks like a calm hue.
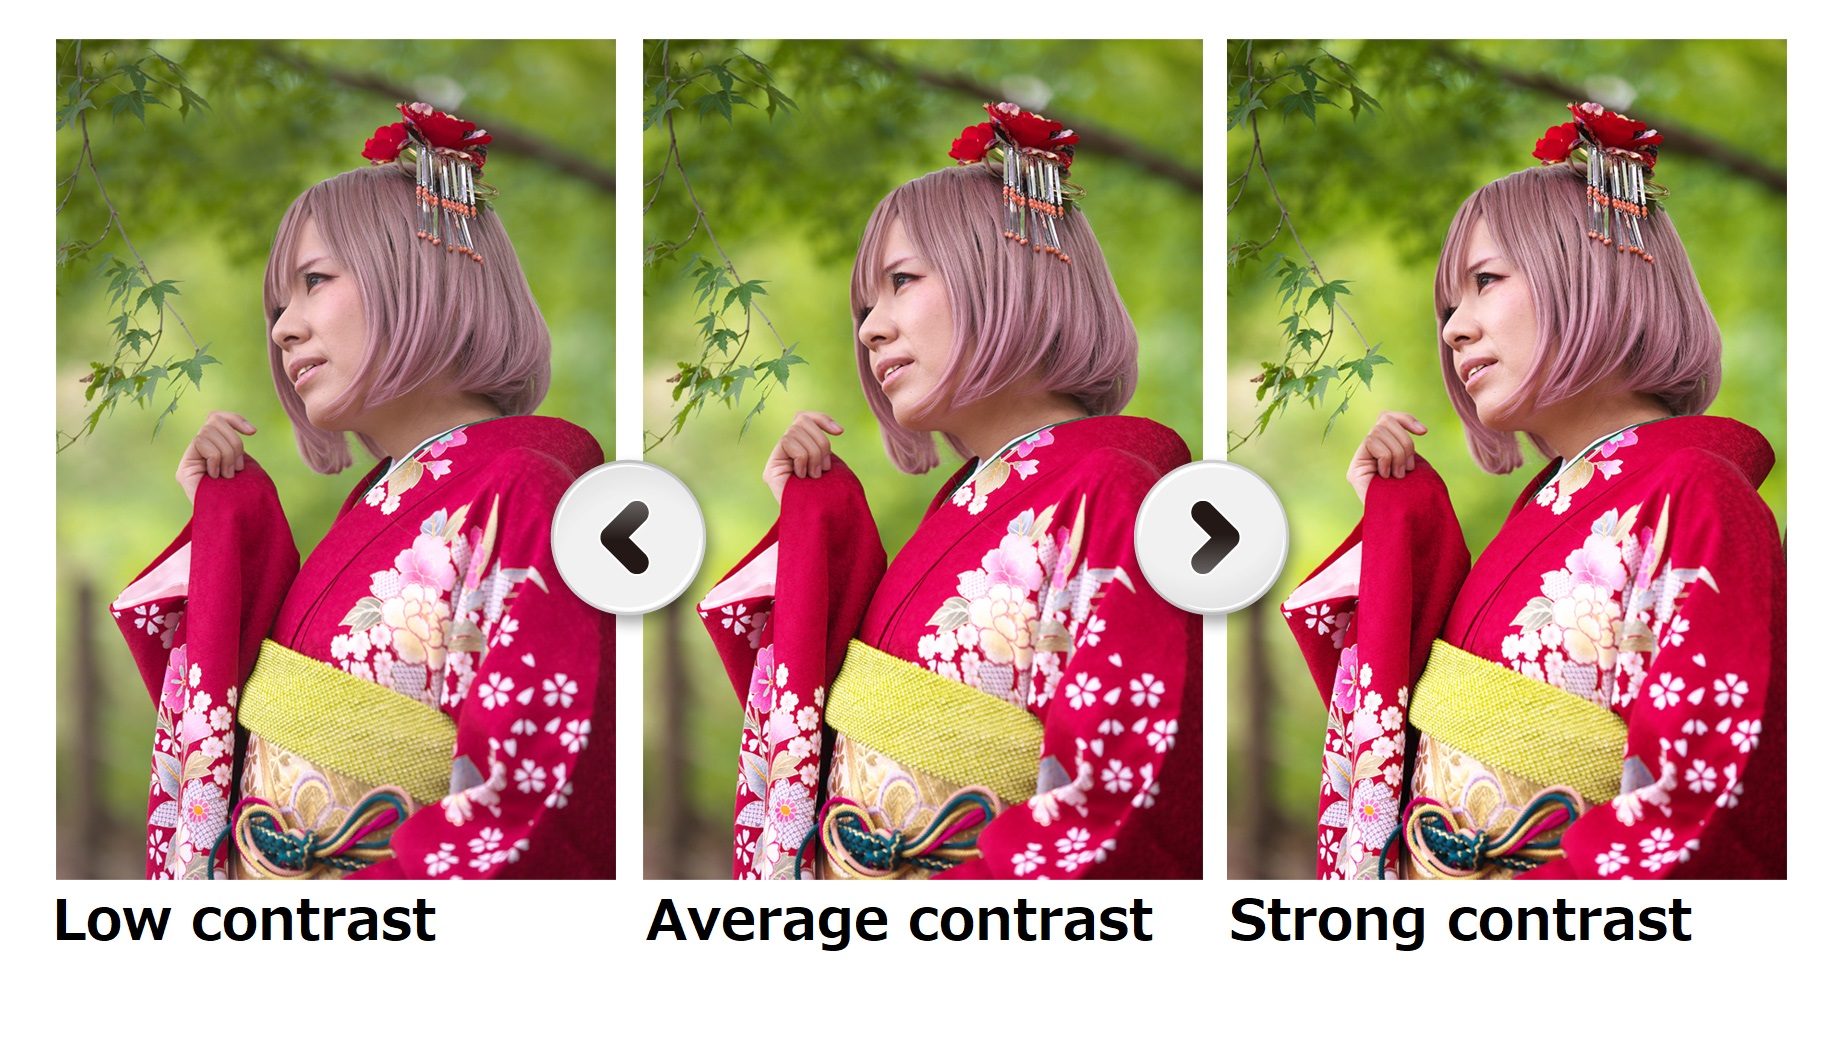
Since the light in the case of shooting is weak on cloudy weather, we chose “Strong contrast” to emphasize the three dimensional feeling and to draw out the vividness of clothing, hair, and background green. It can also express the transparency of the flesh tone.
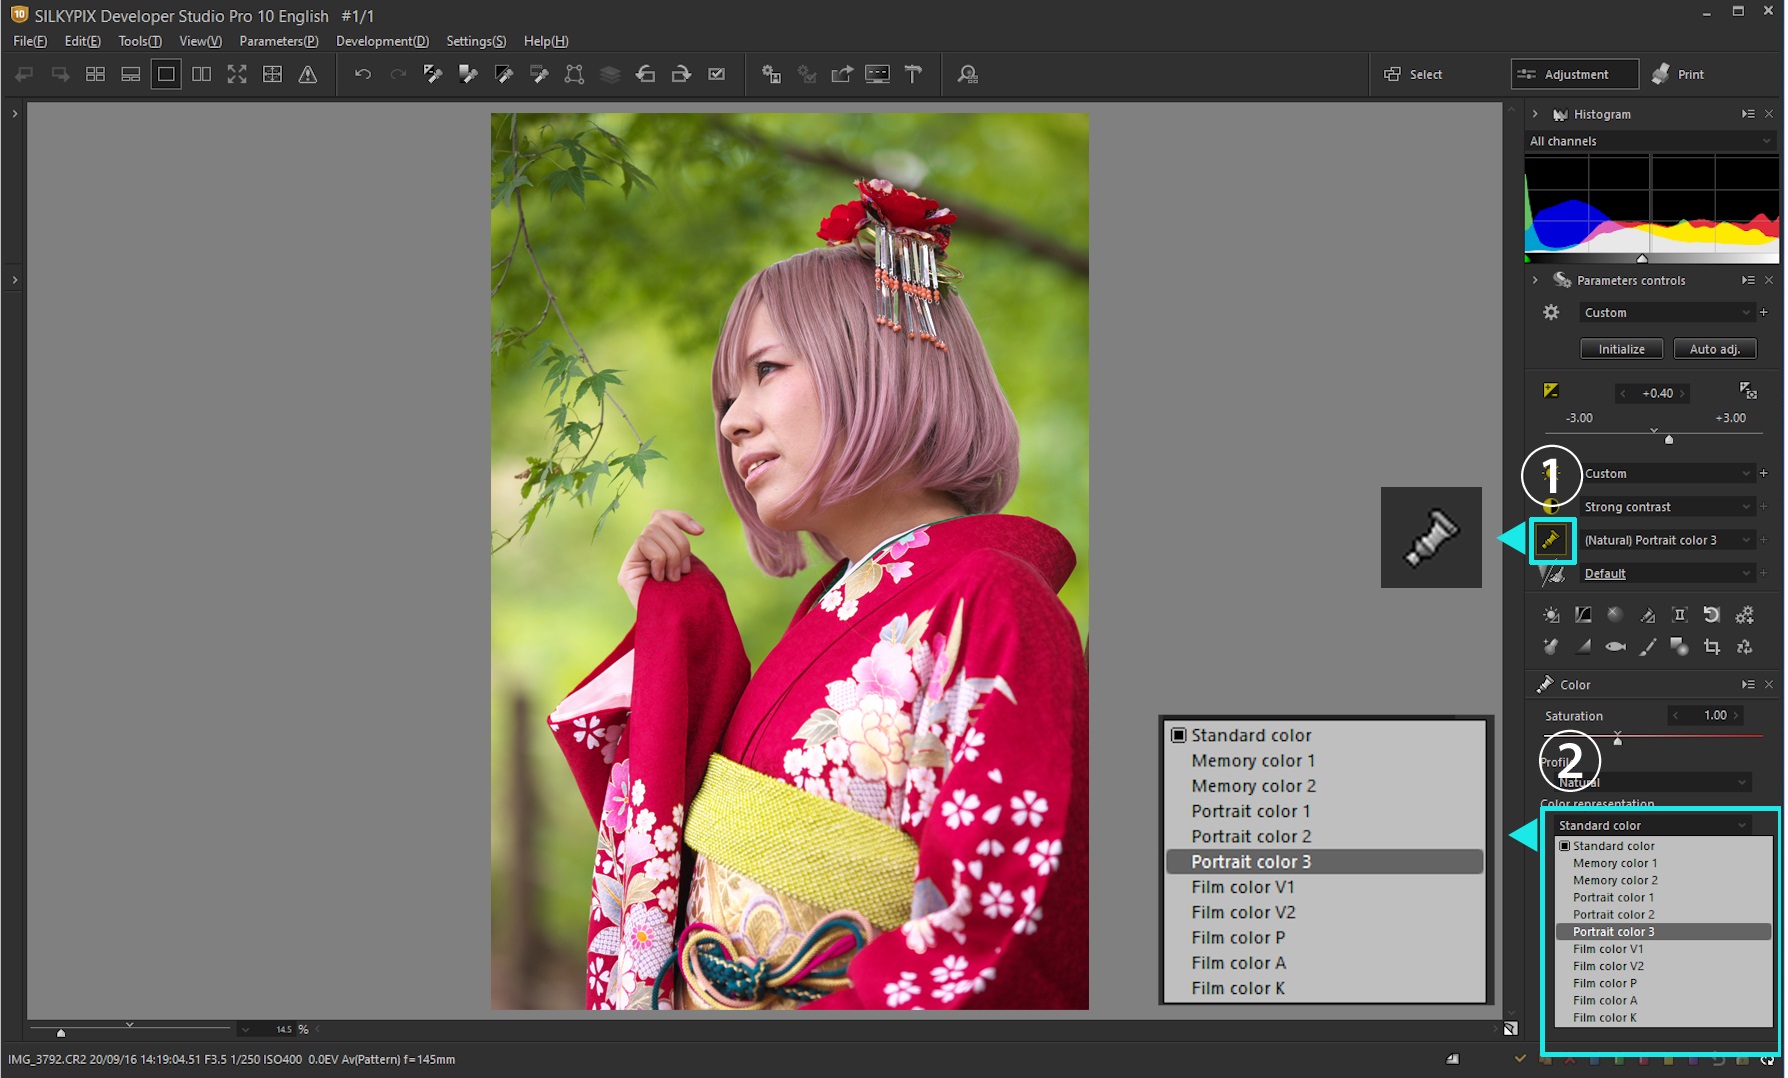
4. Color (reproduction the flesh tone color)
In the case of silver halide photography, a portrait may be taken by changing the type of film that can reproduce the flesh tone cleanly. Also, with your digital camera, you can set the camera’s image quality to “Portrait” or “Portrait mode” in scene mode or other modes to achieve a portrait effect.
RAW Development in the SILKYPIX Developer Studio series allows you to create a bright flesh tone with less yellow color by selecting a taste for a person from “Color representation” in “Color.”
Select the Color icon (1) to change the tab of (2) to the Color. And, select the Portrait color mode from the Color representation.
- Portrait color 1
The Portrait color 1 reproduces a color equivalent to the skin color of the initial version of this software. It tends to suppress the yellowness of the skin color and increase the redness.
- Portrait color 2
The Portrait color 2 is a mode that reproduces the beauty of the skin using the new color reproduction technology “3D Color Mapping Method.” Please try the Portrait color 1 or 2 when it matches your image.
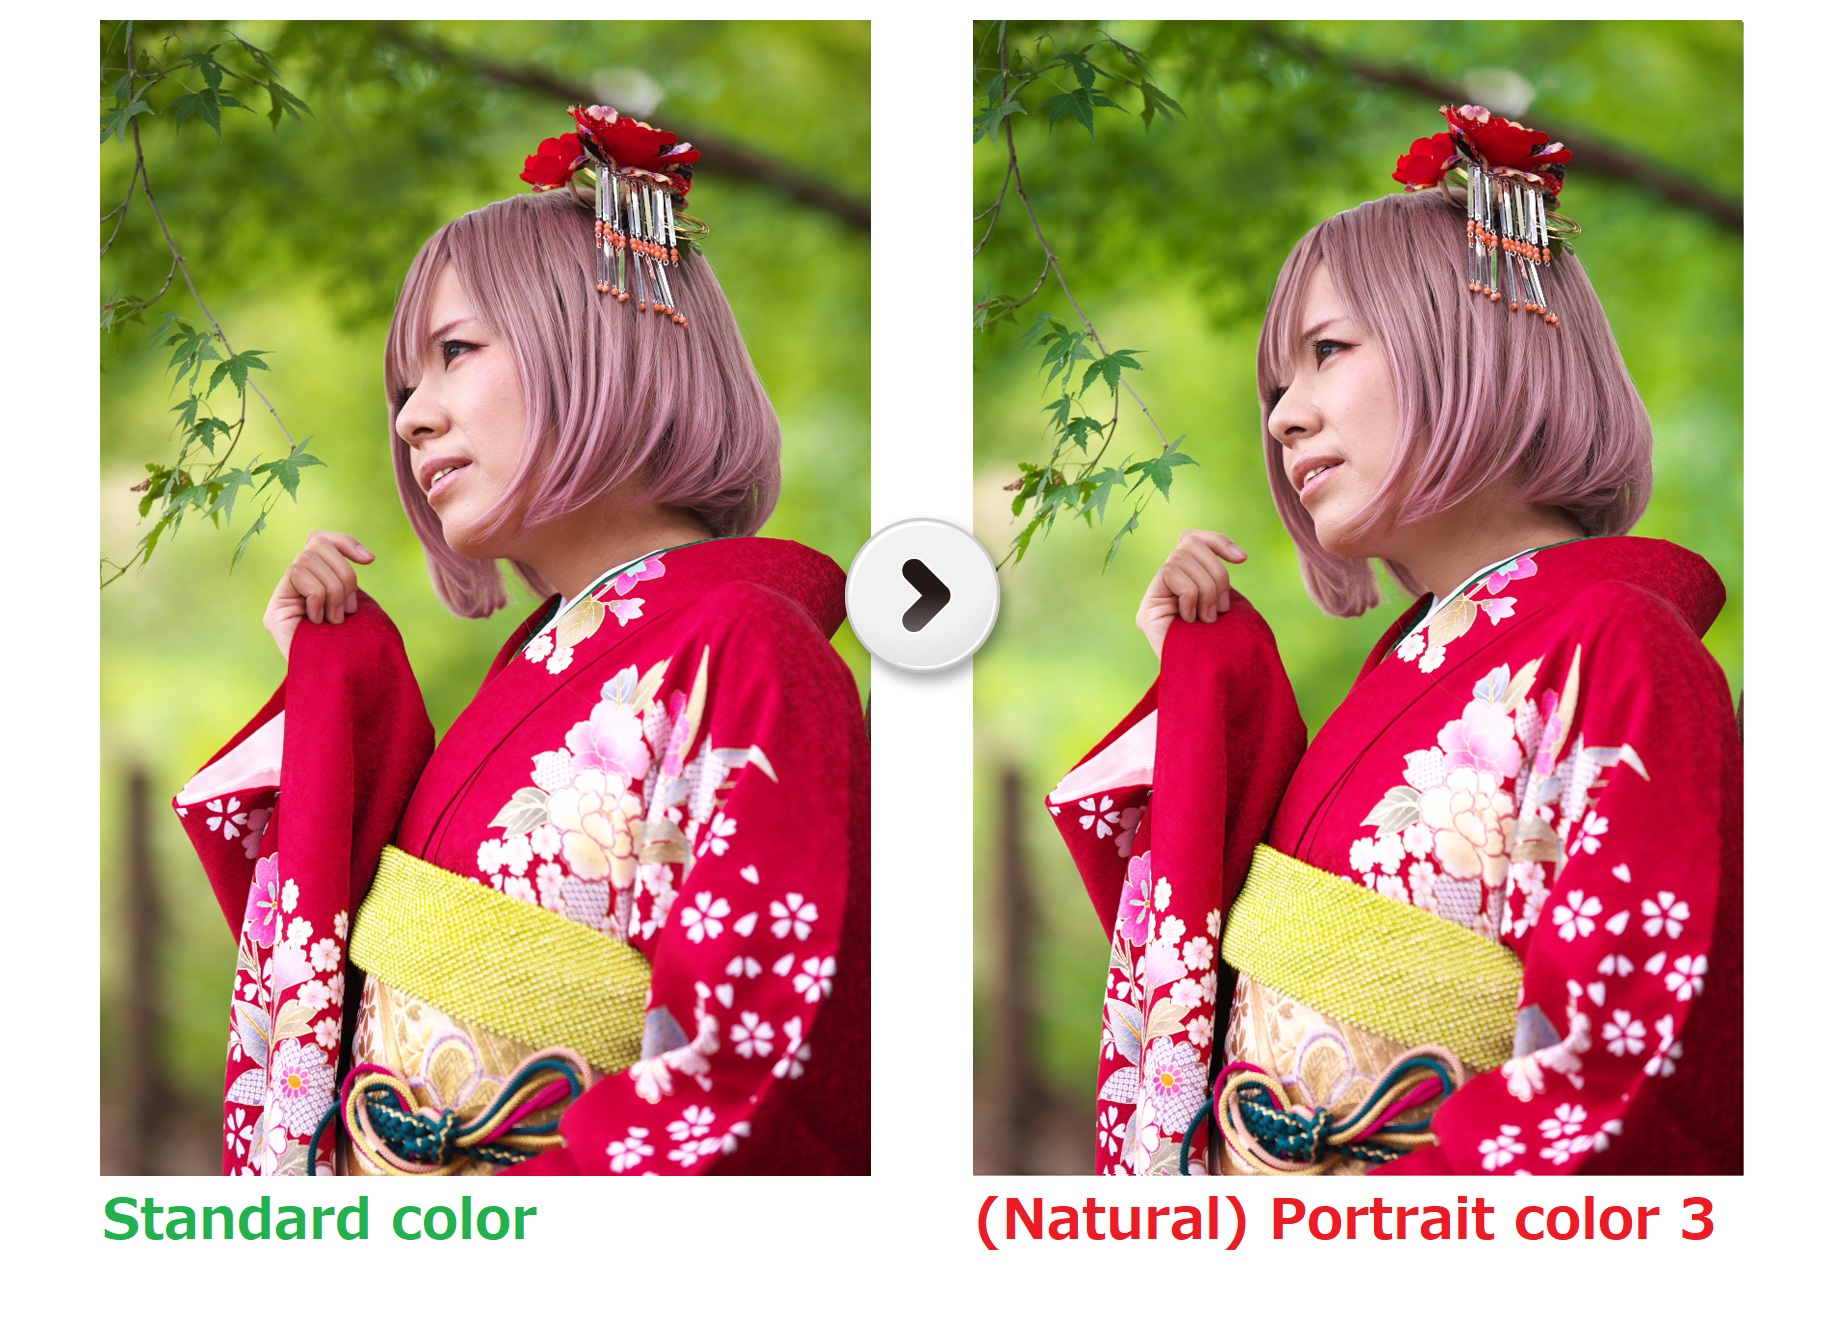
- Portrait color 3
This is recommended for the Cosplay photos!
As for the flesh tone, light color reproduction with less yellow tone is performed in the same way as for “Portrait color 1 or 2.” However, colors close to the primary color, such as green and red, are emphasized more vividly.
The “Portrait color 3” is recommended for location shoots including Cosplies and backgrounds, as the clothing and background can be reproduced vividly.
- Other Color representations
For landscape photography, there are the “Memory colors” that make primary colors such as blue in the sky, green in new green, and red in red leaves vivid, the “Film colors” that simulates silver salted film, and the “Monochrome” that converts to monochrome images. Select the mode according to the subject or scene.
5. Summary of the 4 Basic Adjustments
RAW is colored differently depending on RAW Development software that opens it. The SILKYPIX series has been famous for reproducing clear flesh tone color among professional photographers and photograph enthusiasts, so you can easily create Cosplay and portrait photographs just by adjusting the four basic items.
The other recommended functions to Cosplay photos
1. Clarity and Portrait beautification
The “Color (Portrait color)” in the Four basic adjustments reproduces the flesh skin of a person. The “Clarity” and “Portrait beautification” is a function to adjust the “texture” of the skin, such as pores and horny substance.
Recent digital cameras have become high resolution. So, the details of subject are becoming clearer in photos. However, I think times like thet you want to avoid to too visible for the texture of the skin. In that case, use this function to soften the texture.
Portrait beautification
It can detect flesh tones in your photos and soften the detail in that area. It does not affect the color other than flesh tone, so please use it easily.
When you click the sub-control icon (1), the “Effect” window is displayed. You can adjust the items in (2) “Portrait beautification.”
- Effect
This adjusts the emphasis of effects to replace skin chapping and keratin with skin tones. Dark colored blotches on skin can be easily eliminated by raising the effect.
- Range of effects
You can select from three types: Large, Medium, and Small.
This sets the range of effects for portrait beautification processing. By increasing the range of effects, you can eliminate large blotches that cannot be removed simply by adjusting effect.
You may want to select “Large” if model’s face is large in your photo, or “Small” if model’s full-body (face is small) in your photo.
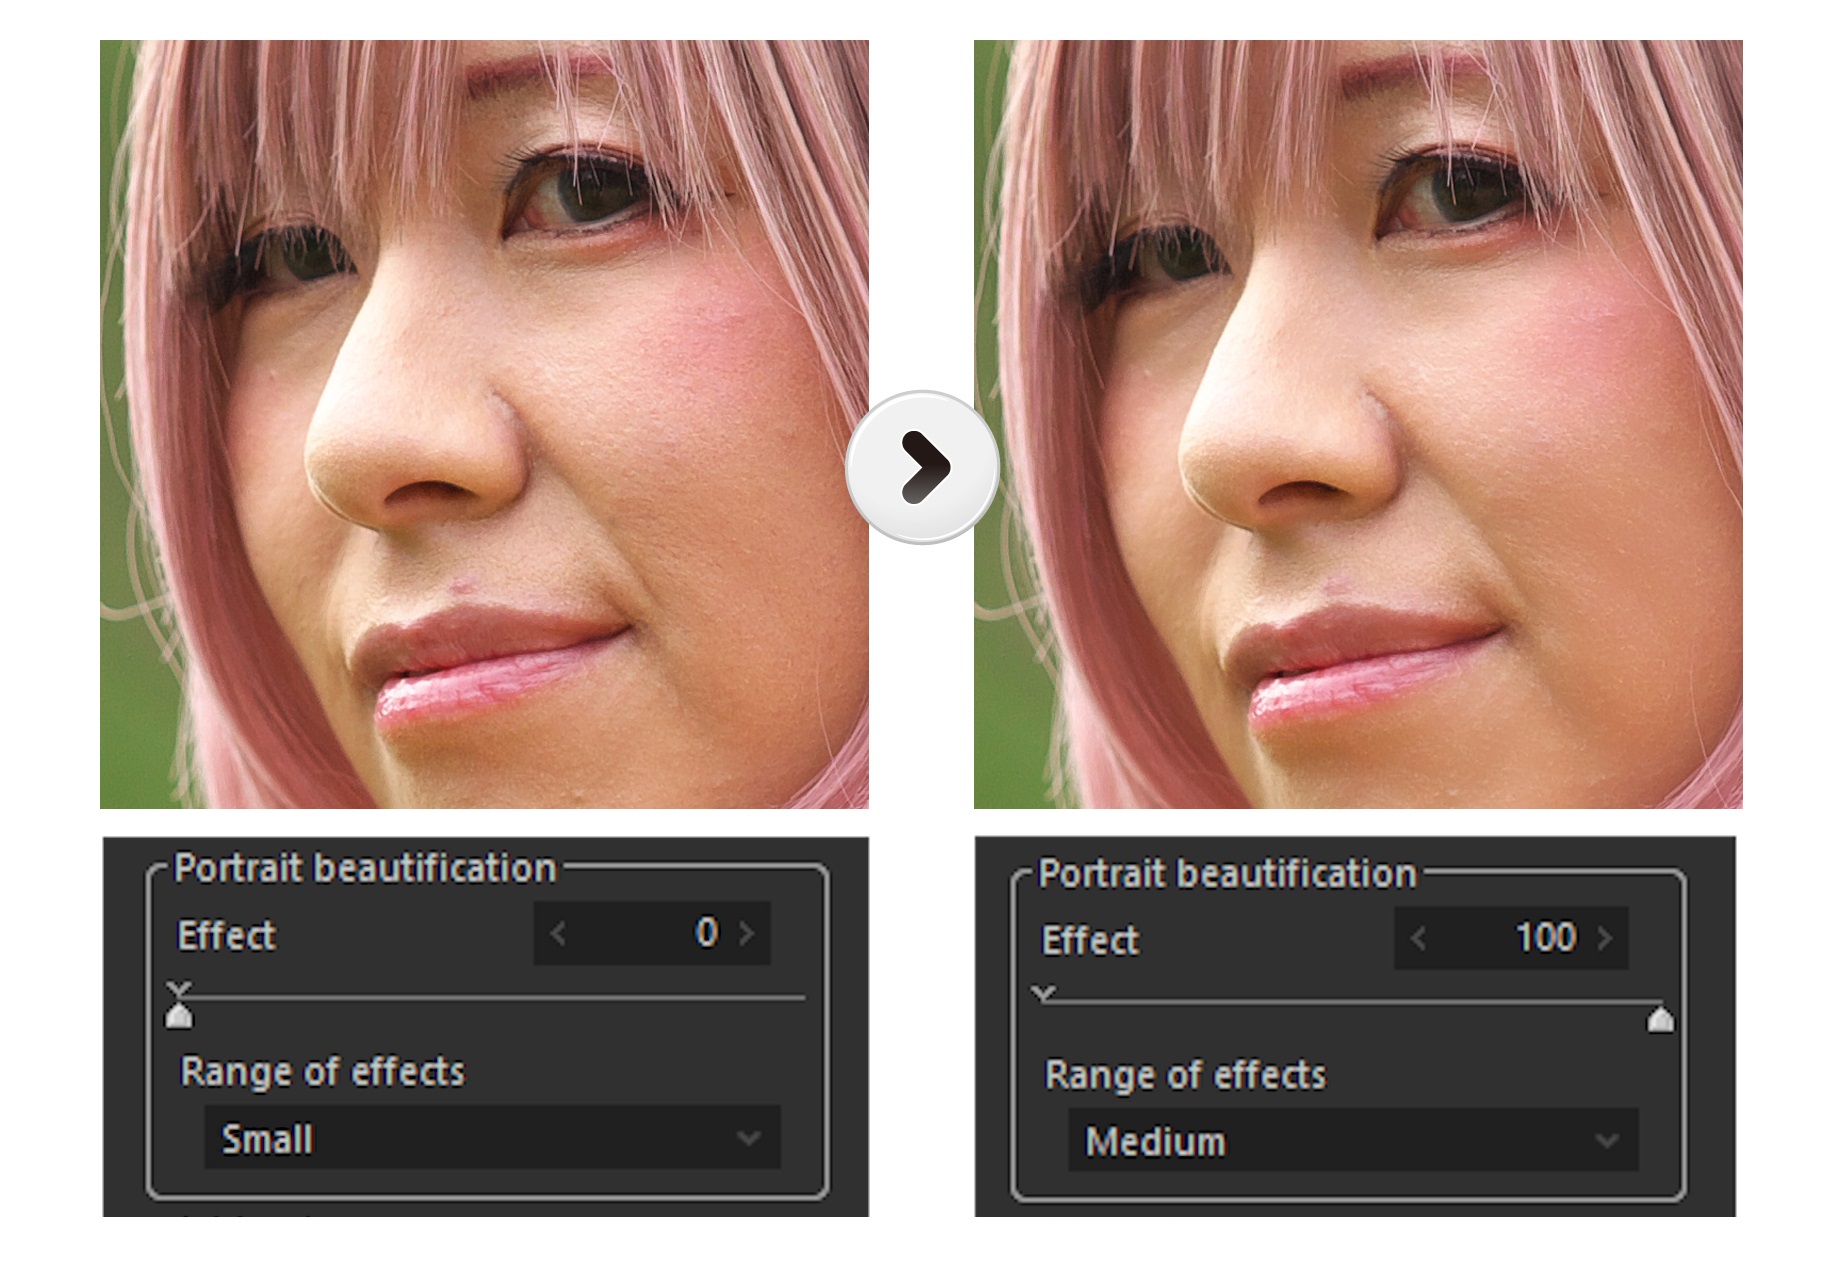
This effect is relatively gentle and natural. You can see that non-flesh tone resolutions, such as eyelashes and hair, remain sharp.
Clarity
Clarity adjusts the fine texture of the subject. In the Cosplay photos or Portrait, it allows you to reduce the texture of skin and express it smoothly by setting a lower Clarity. And you can also get a soft effect like a soft filter.
The Clarity is in the Tone. Clicking Tone icon in (1) switches the tab page in (2).
You can reduce the texture of the subject by adjusting the Clarity slider to the-(minus) direction. You can obtain the beauty effect by adjusting it to a lower, and the effect of a soft filter by adjusting it to a stronger.

- Clarity (beauty effect)
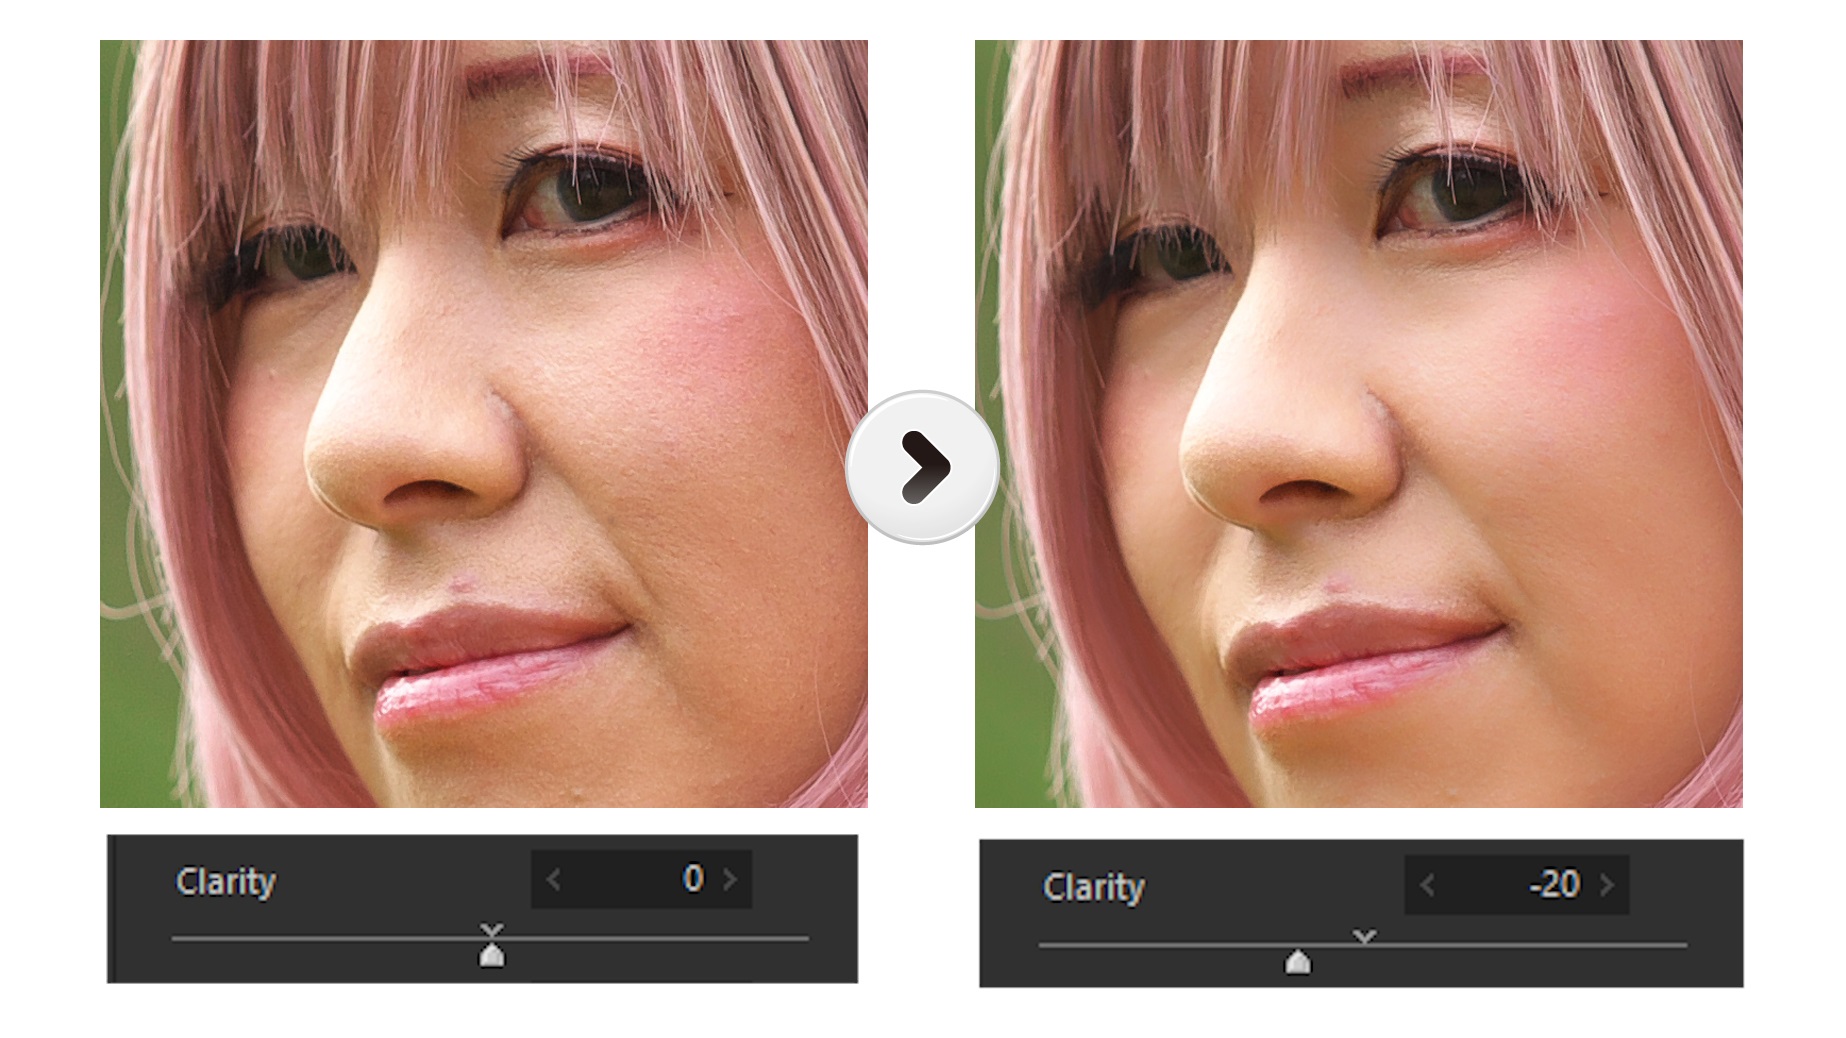
By setting the Clarity to -(minus), you can reduce the texture of the skin and obtain a beautiful skin effect. The Clarity effects also the texture of the eyelashes, hair, etc. Therefore, it is important to adjust the balance between the beauty effect and the sense of resolution.
- Clarity (software filter effect)
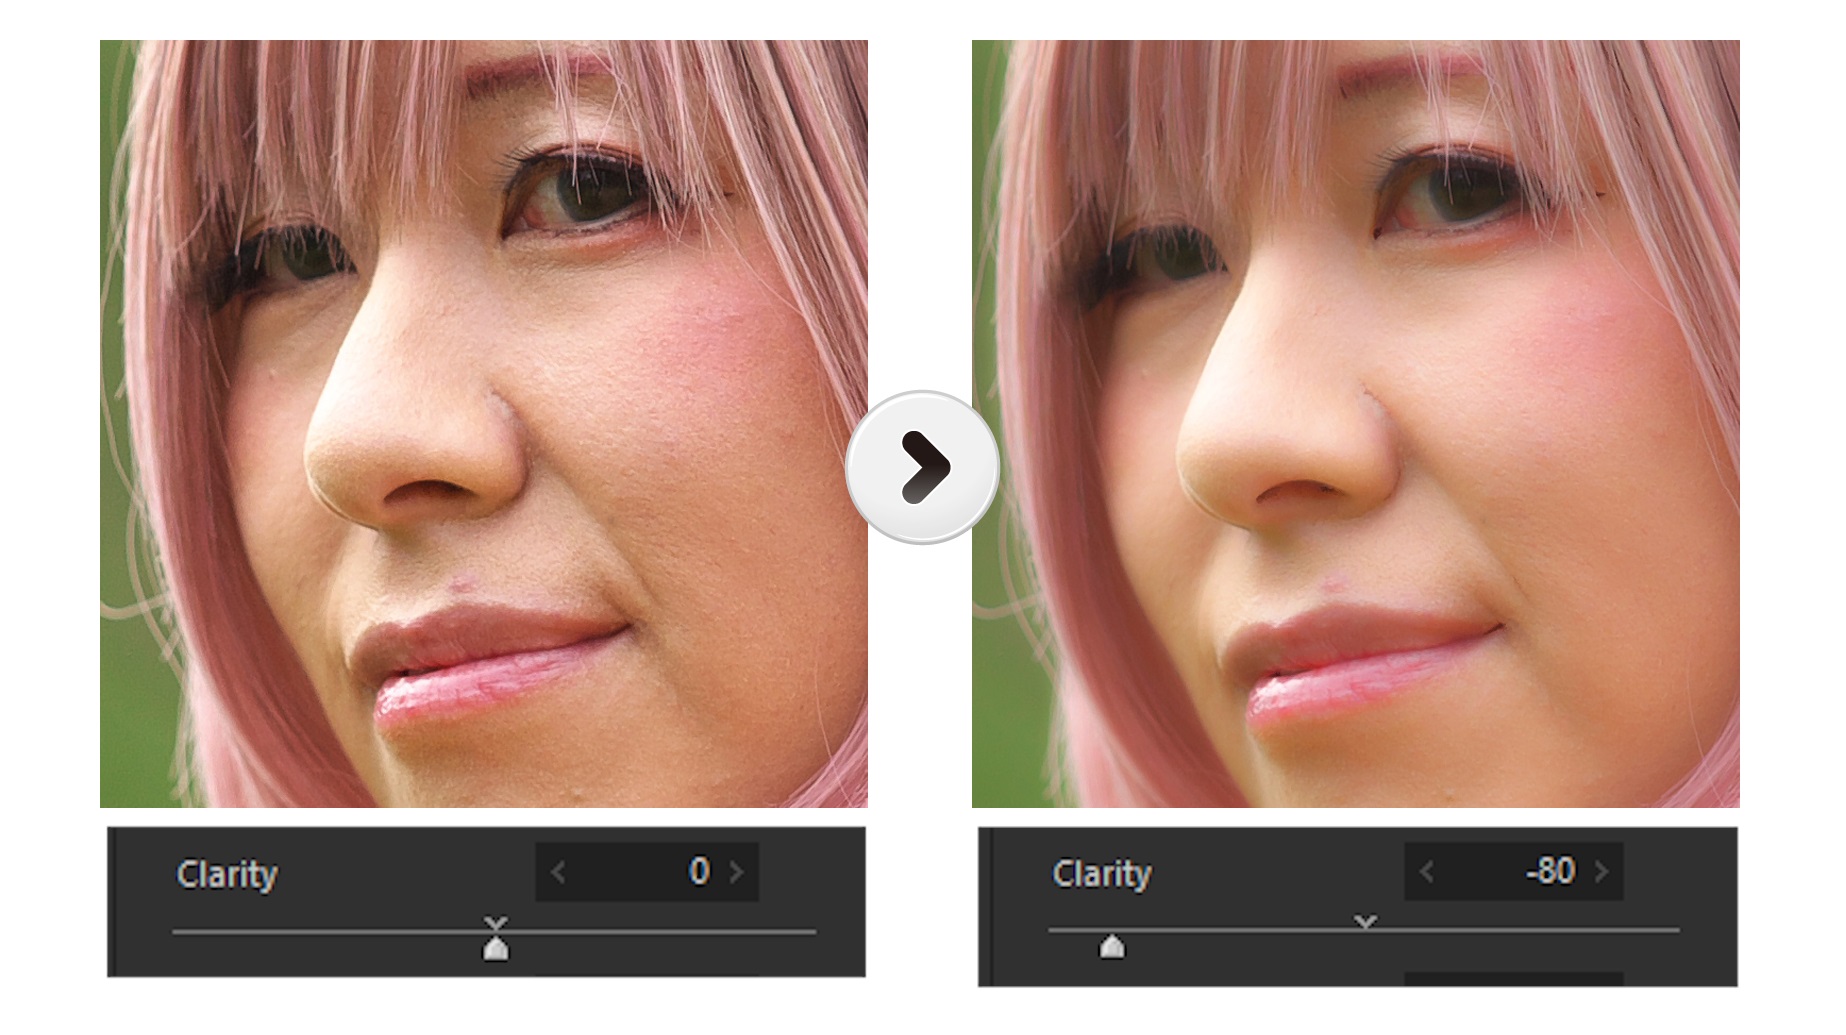
By setting the Clarity strongly to -(minus), you can create a soft expression like soft focus. Not only the flesh tone but also the entire image, such as the eyelashes and hair, is reproduced softly. However, the focus core remains.
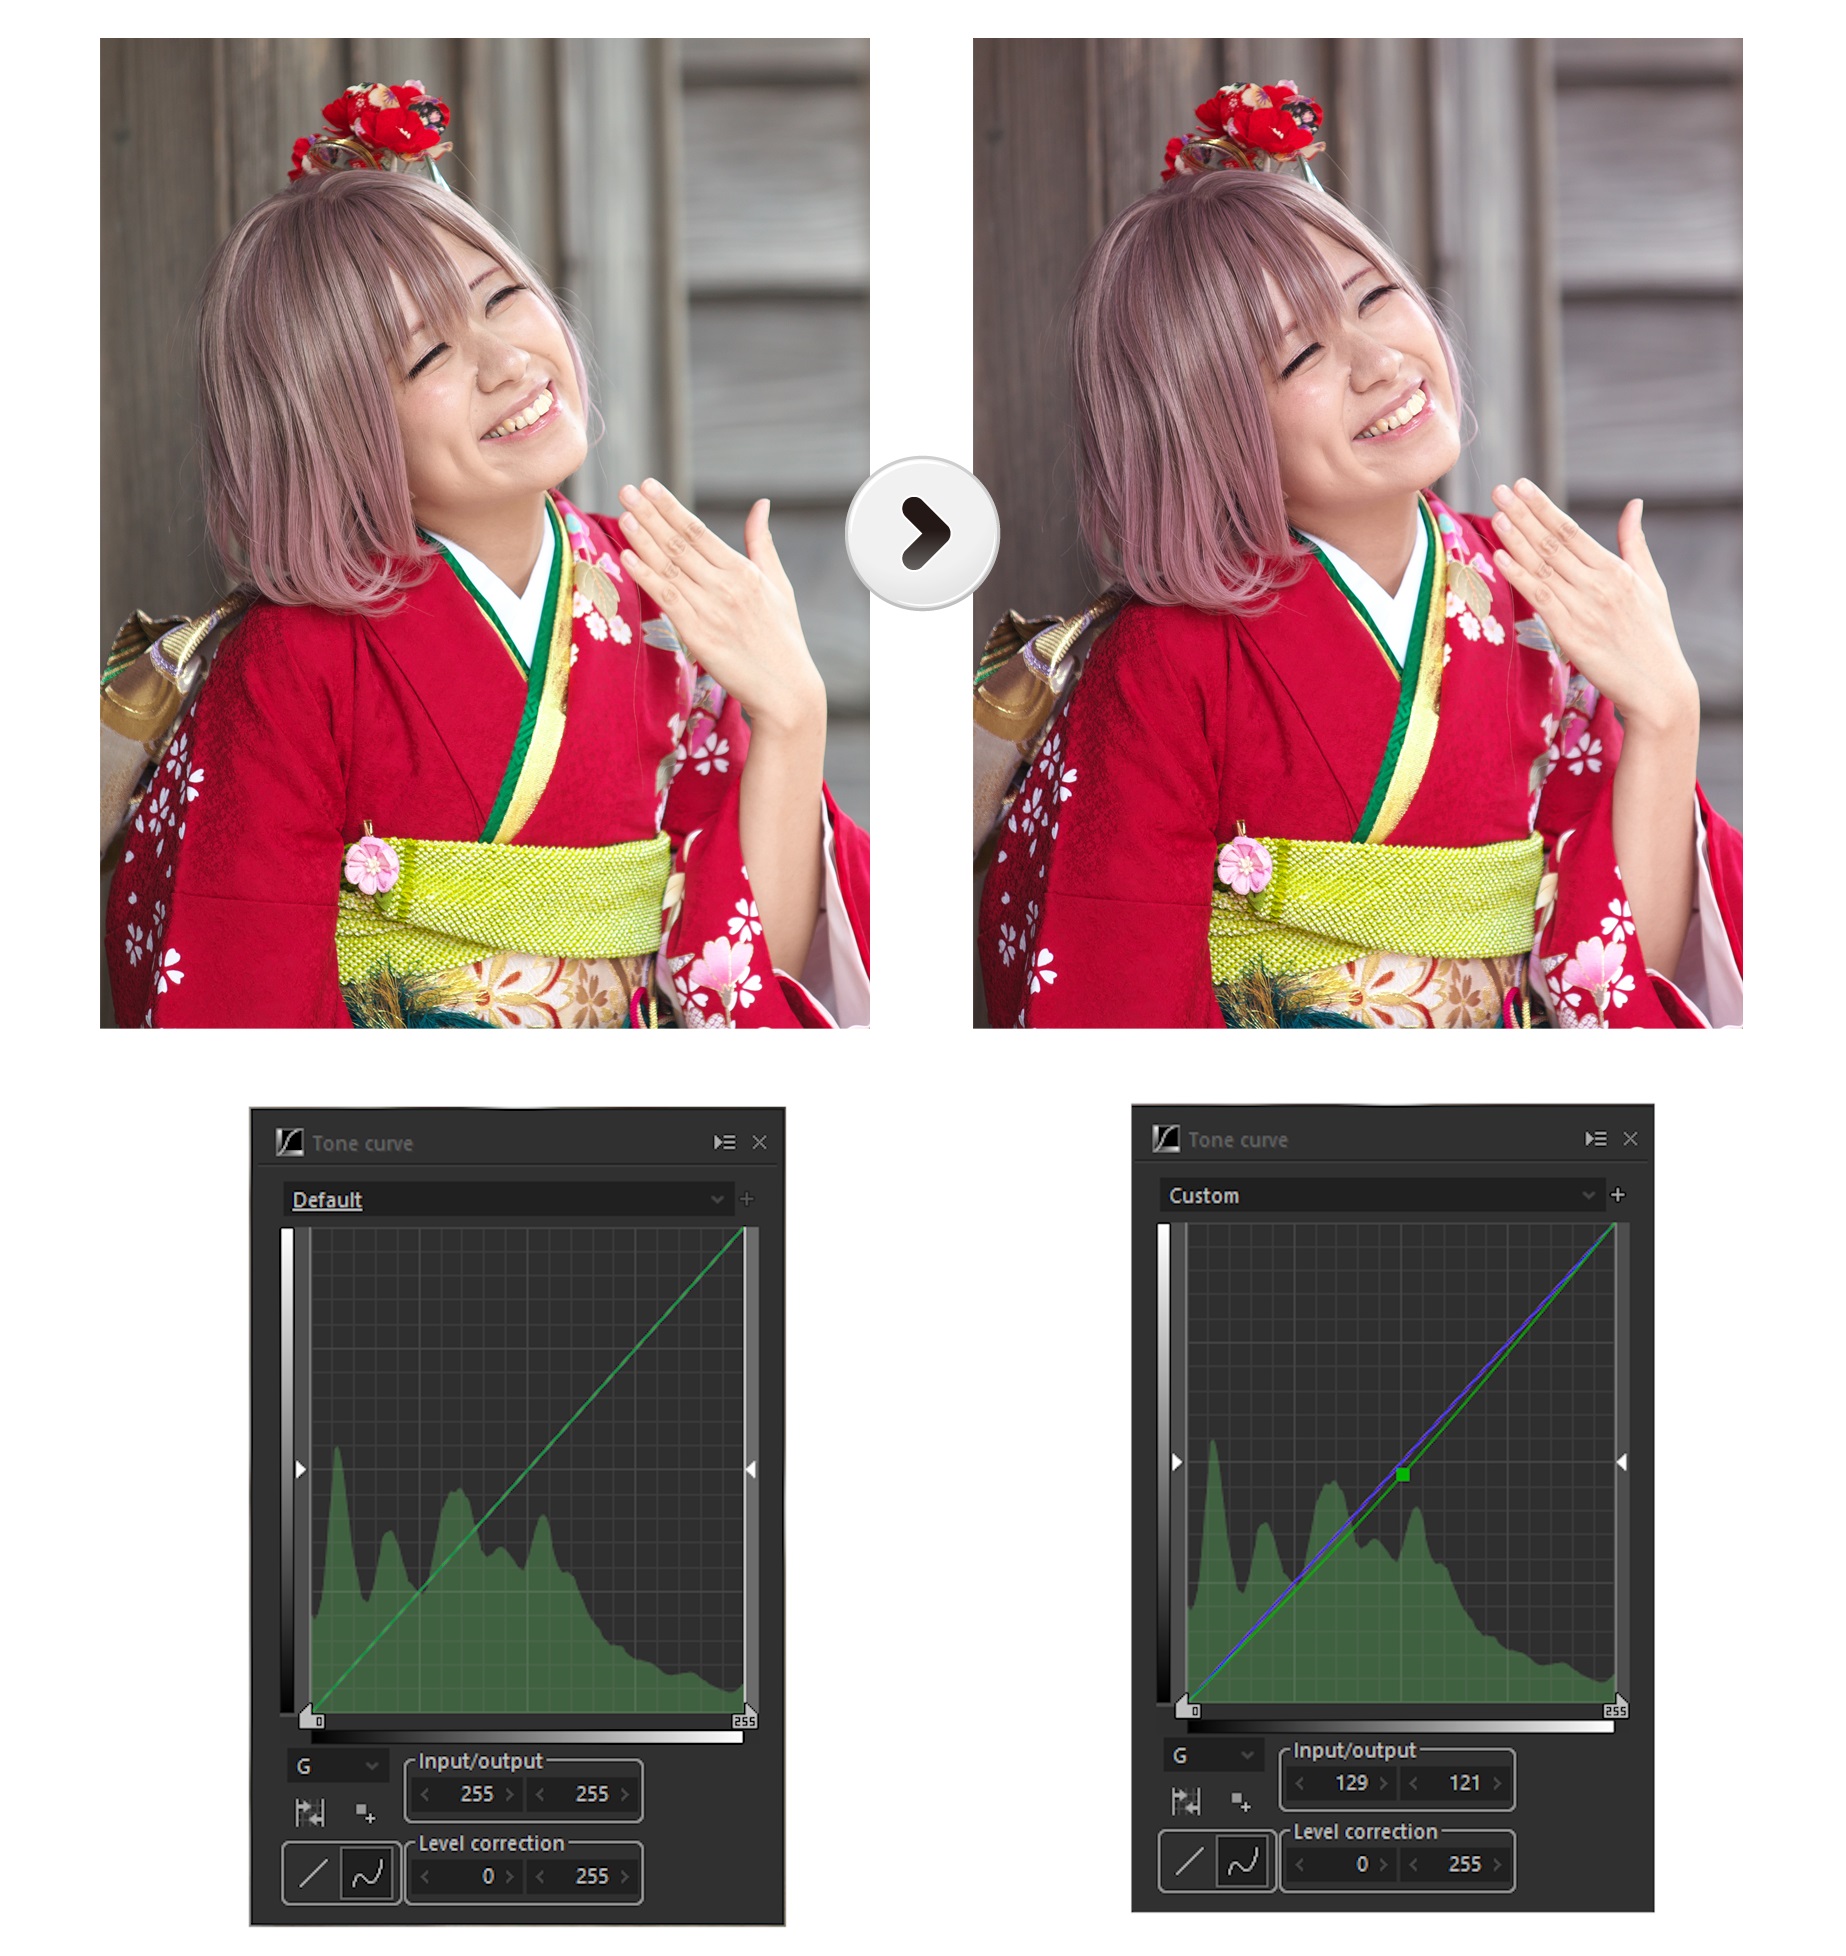
2. Adjusting colors in the Tone curves
While it is common for Tone curves to adjust the brightness and contrast using “S Curve,” you can adjust the color using “RGB Tone curves.”
“RGB Tone curves” changes the color balance of the specified brightness by emphasizing or suppressing the color components of red, green, and blue.
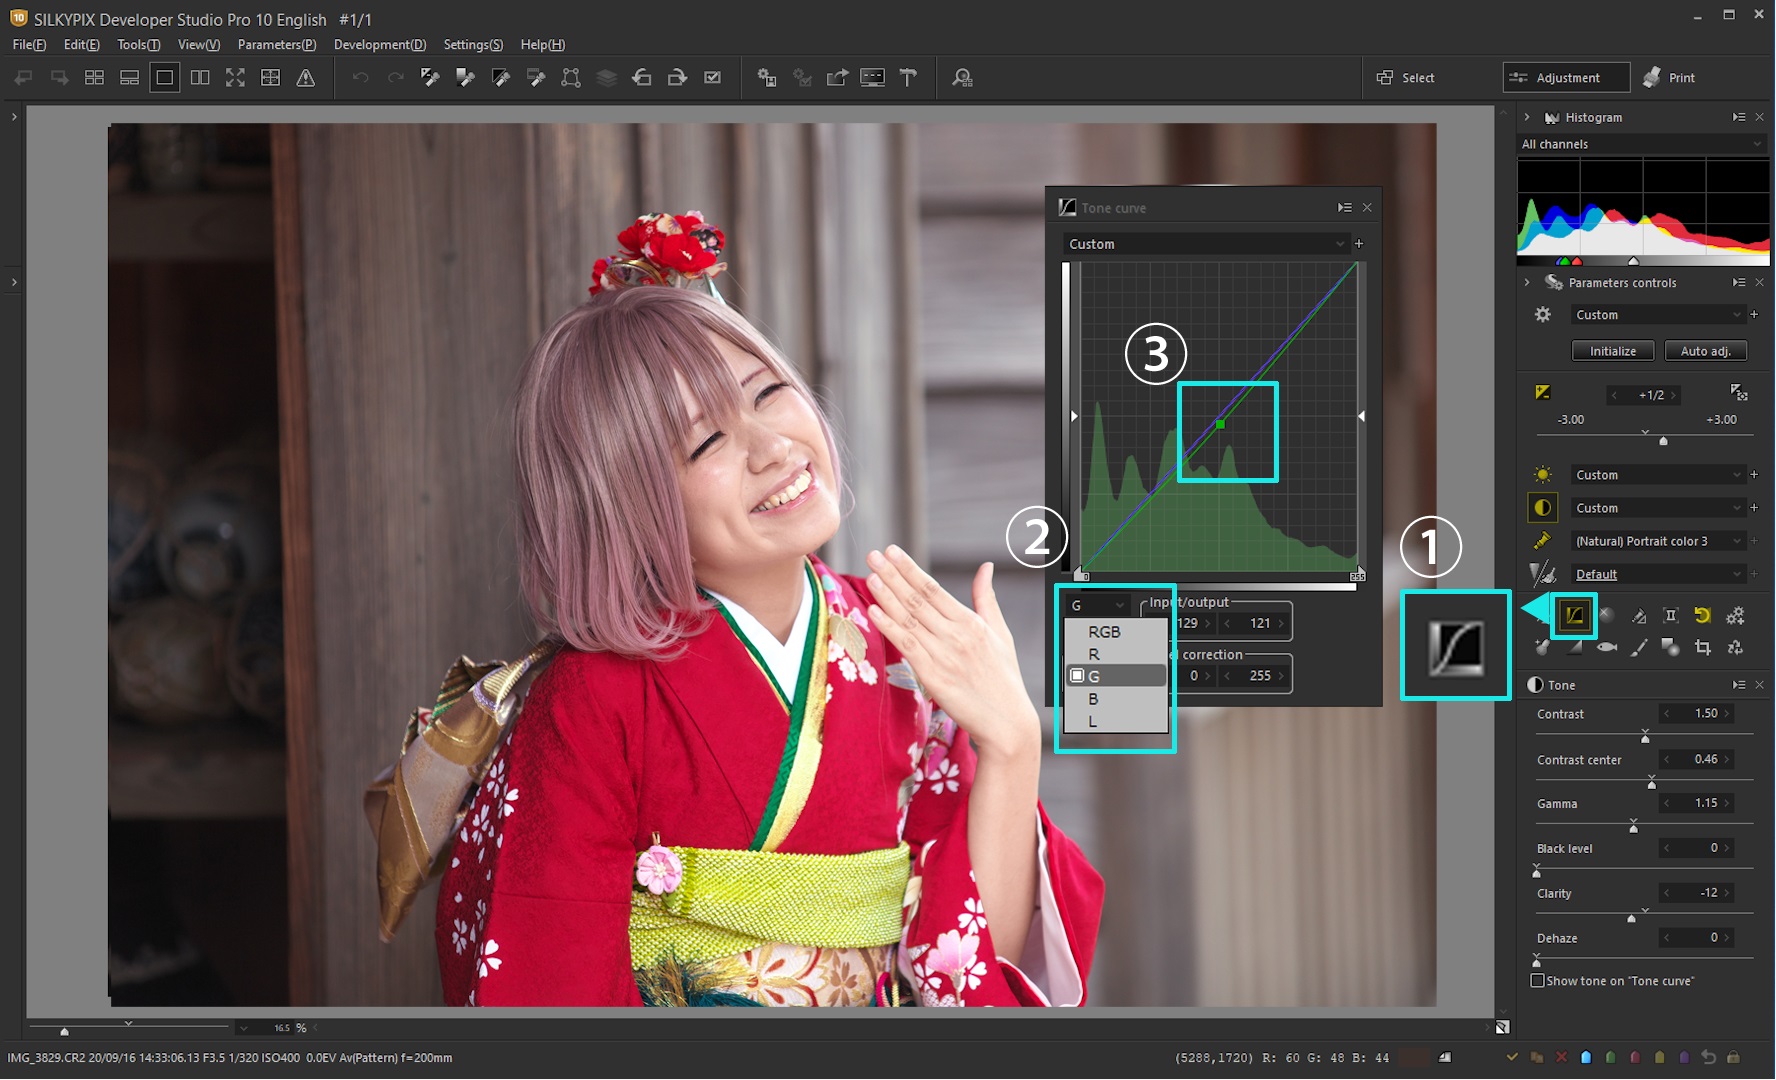
In this example, we will show you how to revive the flesh tone color when it becomes yellow or green.
Tone curves can be viewed by clicking (1) from the sub-control icon. From Tone curves control, open the drop-down list for (2) and select G (Green Channel).
In the chart on the Tone curves, add a configuration point in the middle of (3) to slightly lower the midtone and reduce the green.
The yellow is removed from the flesh tone, and a little reddish has appeared. The point of tuning in RGB Tone curves is to “fine-tune.”
Since the skin tone originally has a color that is close to an achromatic color, even a slight adjustment can make the appearance look very different compared to the dark color.
3. Restoring blown out highlights
Under heavy sunlight or high light/dark conditions, placing exposure over model’s face may cause clothing to be too bright and white as if it were missing.
This blown out highlights, with JPEG photo retouching, you will not be able to restore colors or gradations. However, because RAW is still data, you can use the “Highlight” function on the SILKYPIX series to recover during RAW Development.
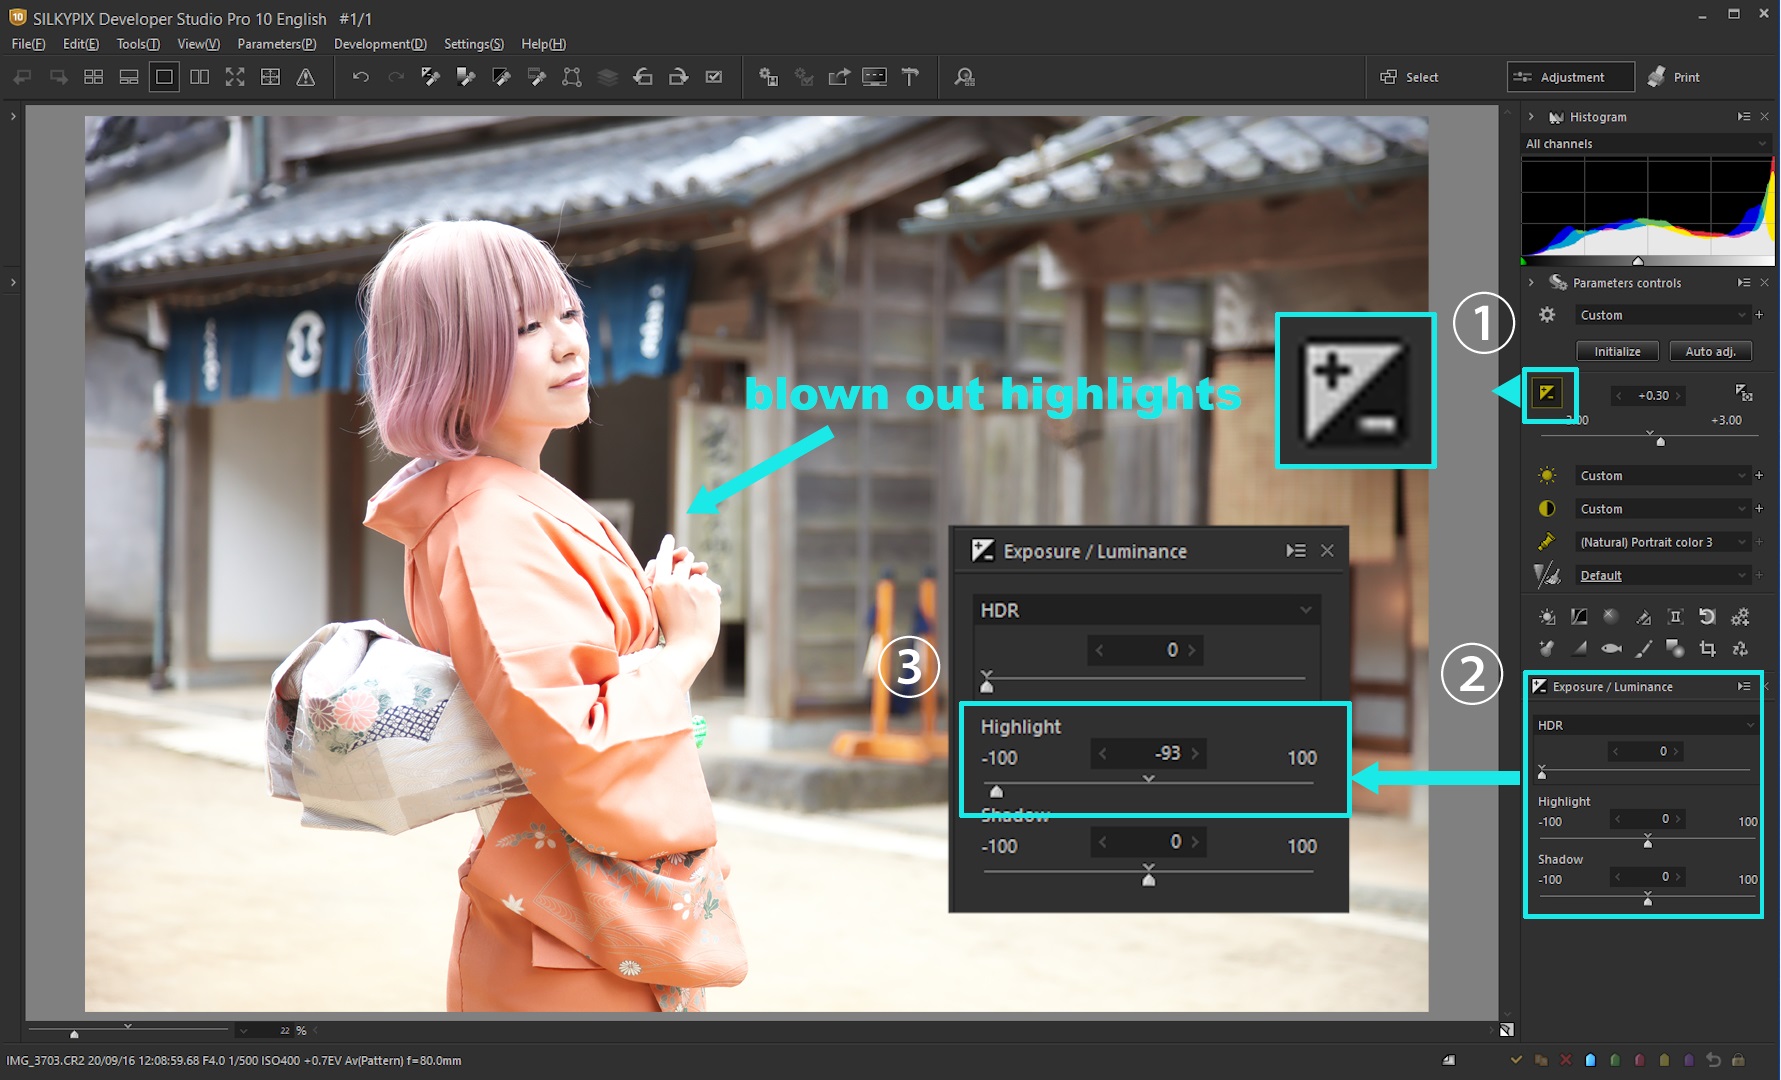
“Highlight” changes the tab page of (2) to “Exposure / Luminance” by clicking exposure correction icon in (2). You can restore the blown out area by adjusting the (3) Highlight slider to the – (minus) side.
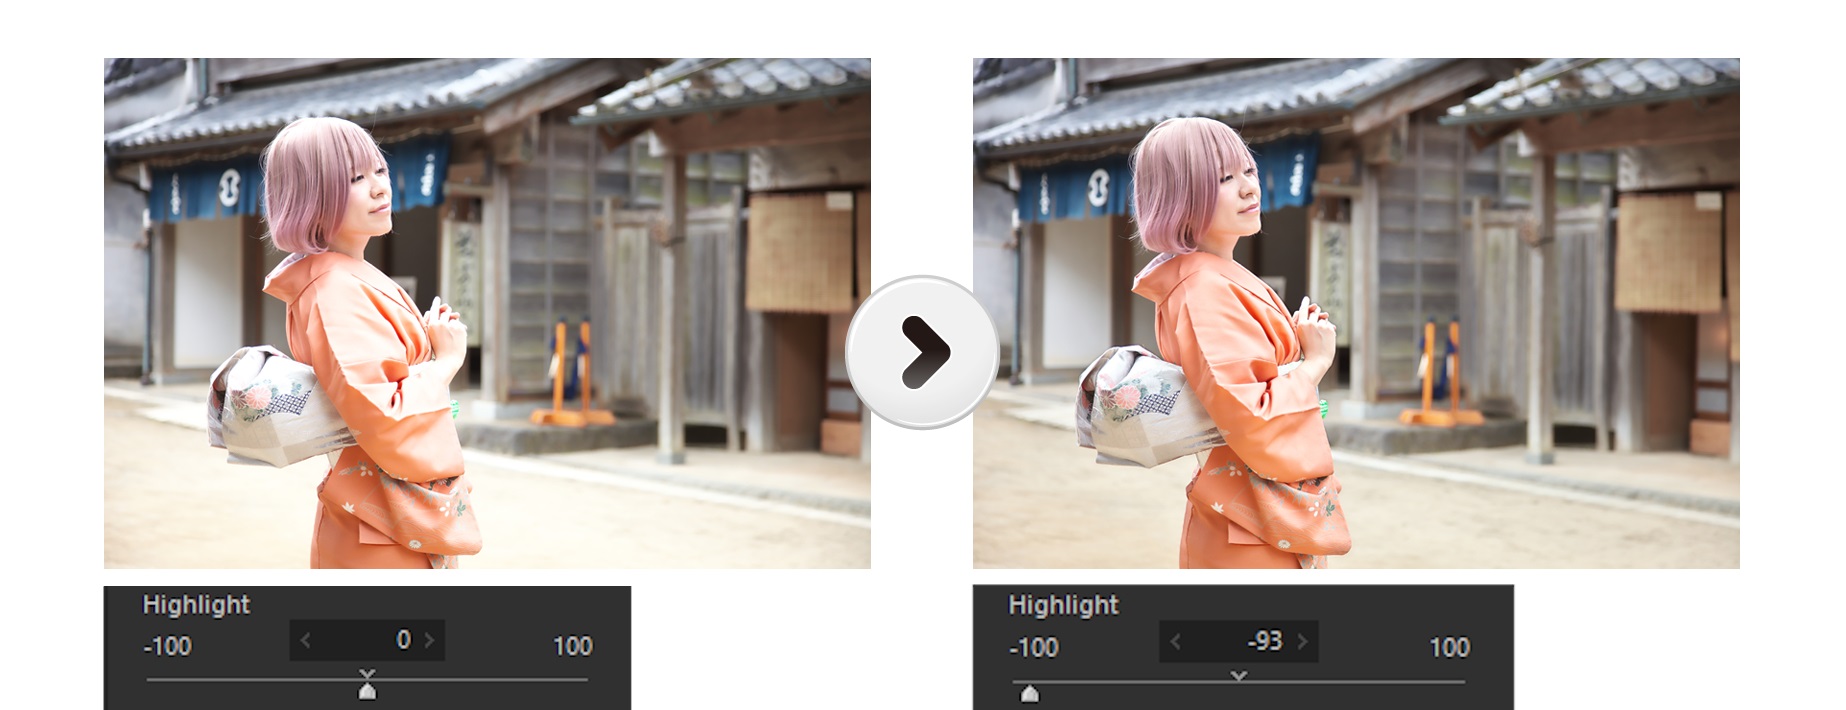
It can restore the color gradation of a lit clothing or face without changing the brightness of the entire photo. This way, RAW can restore the blown out highlights, which is effective when you shoot outdoors, where it is difficult to fine tune the lighting.
Try it first! You can try a free trial for 30 days!
RAW Development software “SILKYPIX Developer Studio Pro10” can be downloaded from the SILKYPIX website. For 30 days after installation, you can try All functions for free as Experience Mode, so please try it out with your photos.
![]()